Interactive mode
This tool has the option to visualize the contents and make some operations on IPM files interactively. It is not a fully graphical user interface (GUI) because it works completely inside a terminal, but it is also not a pure command line interface. This offers the option to be executed on a remote server by using a remote session like when using SSH.
This mode is called Text User Interface or TUI.
To access this mode, we use the OPEN command, which reads the full contents of the file and presents its contents using the full size of the terminal, and lets the operator to navigate and perform some actions by using the keyboard. In some terminals the mouse can also be used.
For this example we will be using file20 that contains 4 logical files as we can see
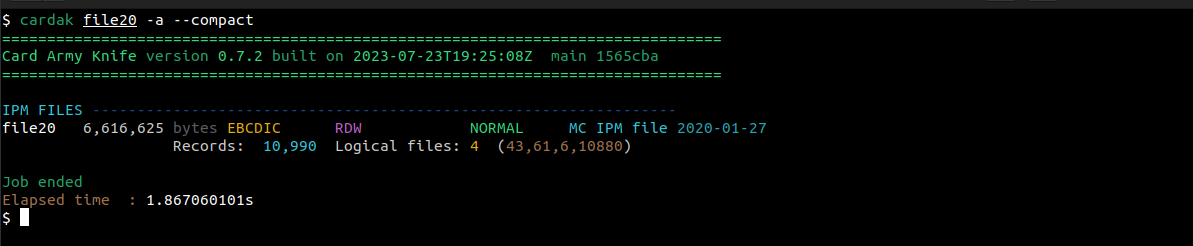
Now, let's open the file by using “cardak open file20”
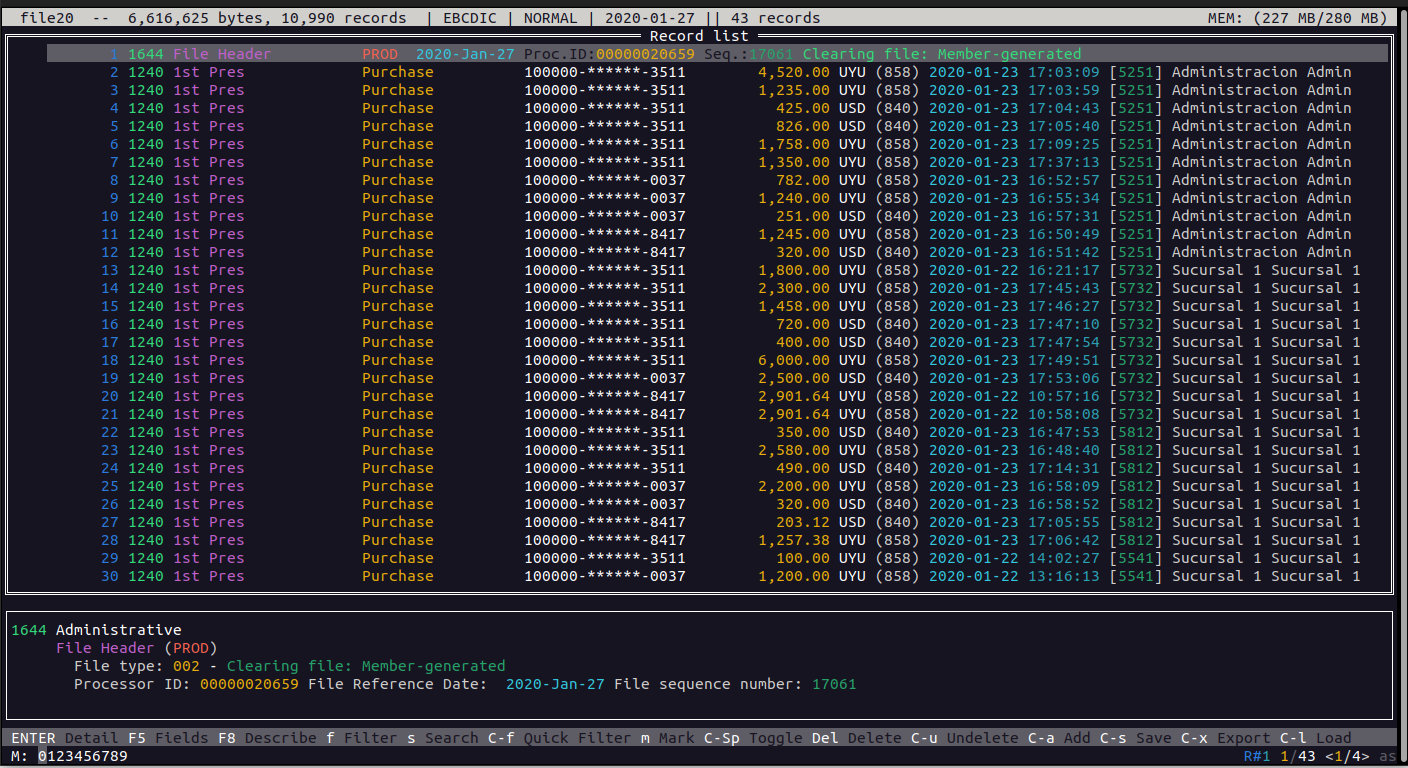
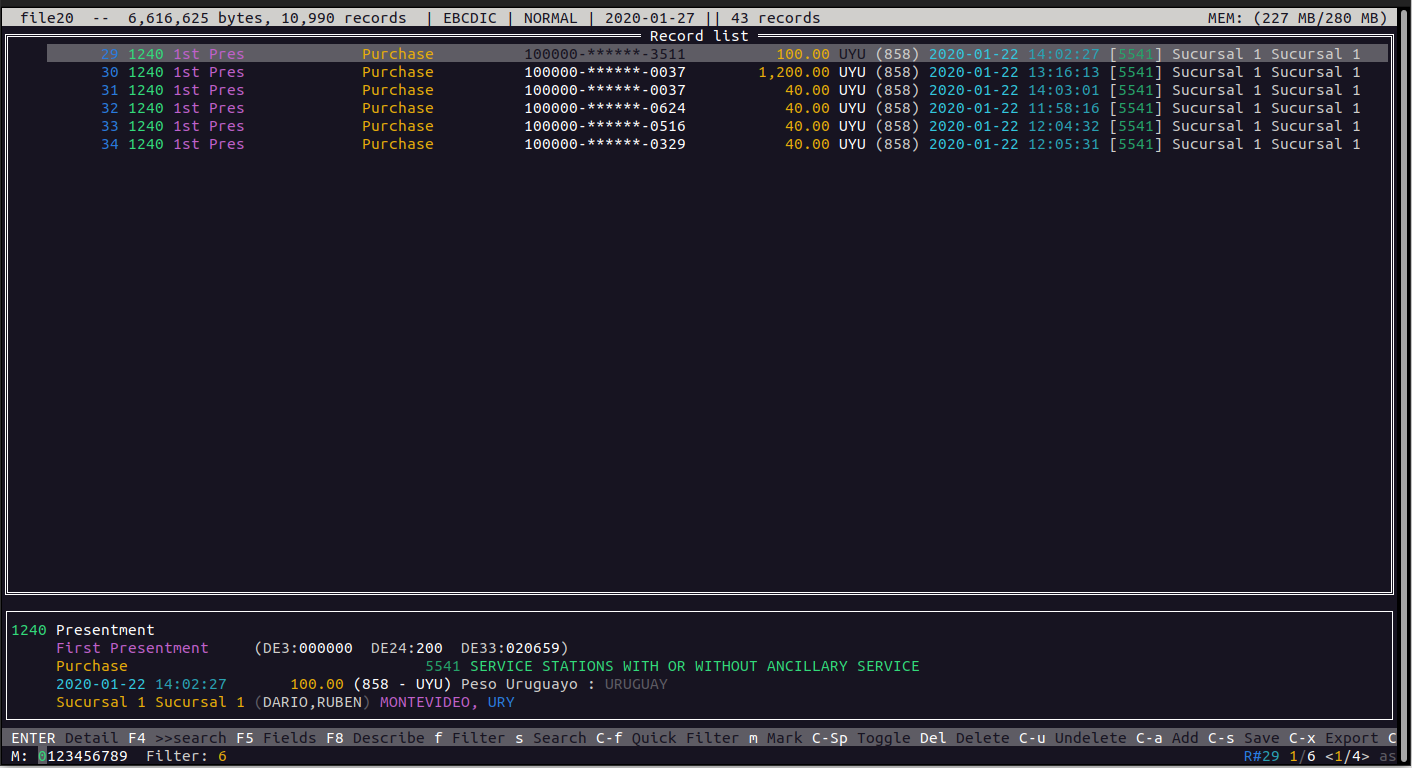
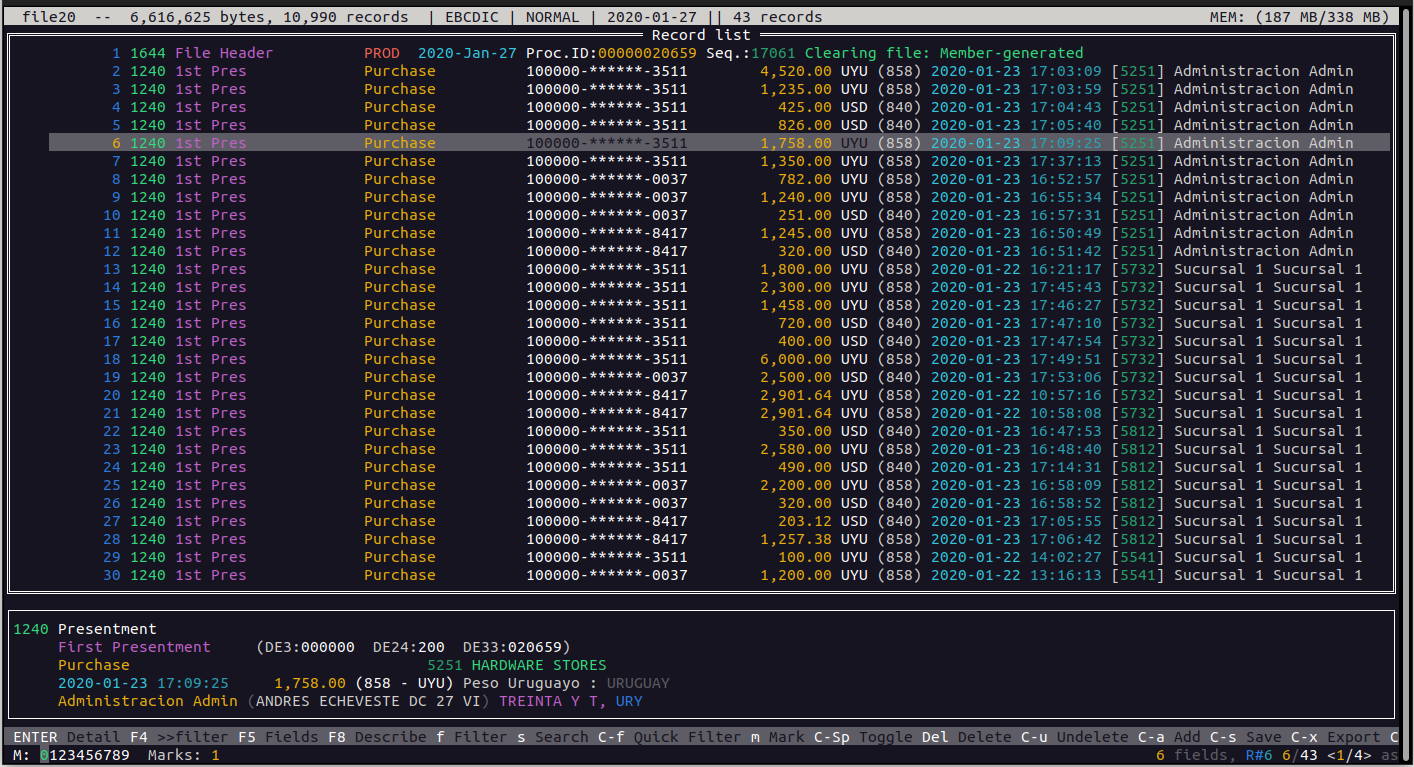
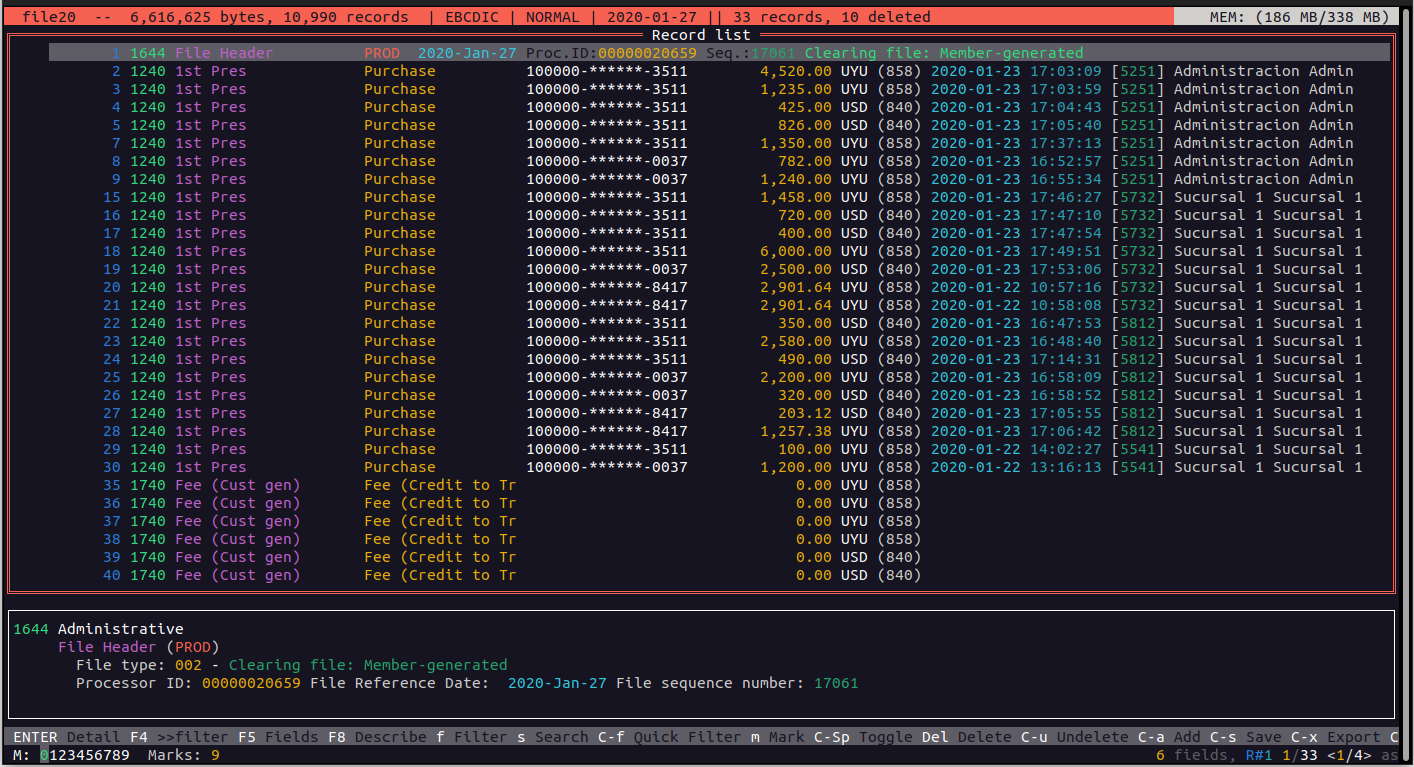
We are presented with the main screen showing the records present in the file (file20 in this case). The screen is divided into 5 vertial sections that we will be describing next.
In the upper part, we have an information bar containing information about the file. We see the size in bytes, the number of total records, the encoding and if it uses blocks of 1014. We also see the date included in the first header and then an area where we will see the number of active records (more information later in this chapter)
Lastly, on the far right, we can see information about the memory usage (reserved by the application and total used by the system)
Below this bar we can see the main area where the most significant values or the records are displayed. We can see, for example, the (real) record number in the file, the MTI and Transaction Type. Depending on the transaction type we can see different information about the record. For example, for regular purchases, we see the PAN (masked), the amount, the currency and its code, the date and time of the transaction, the MCC and the name of the merchant.
Below this main area we have a smaller one where we can see more details of the selected record.
Just below this area we have a line with a gray background where we have a quick help on the available key combinations and their corresponding actions.
At the bottom we can see the status bar. On the left of this bar we have a "slots" indicator (we will see details about this later), a central area for messages, and on the right side we have information about the position in the file of the selected record. We have the record number and the total records in the file, and also the number of logical records. We can also see that we are positioned in the first logical file. There is also an indicator for "Auto Save" wich we will see later.
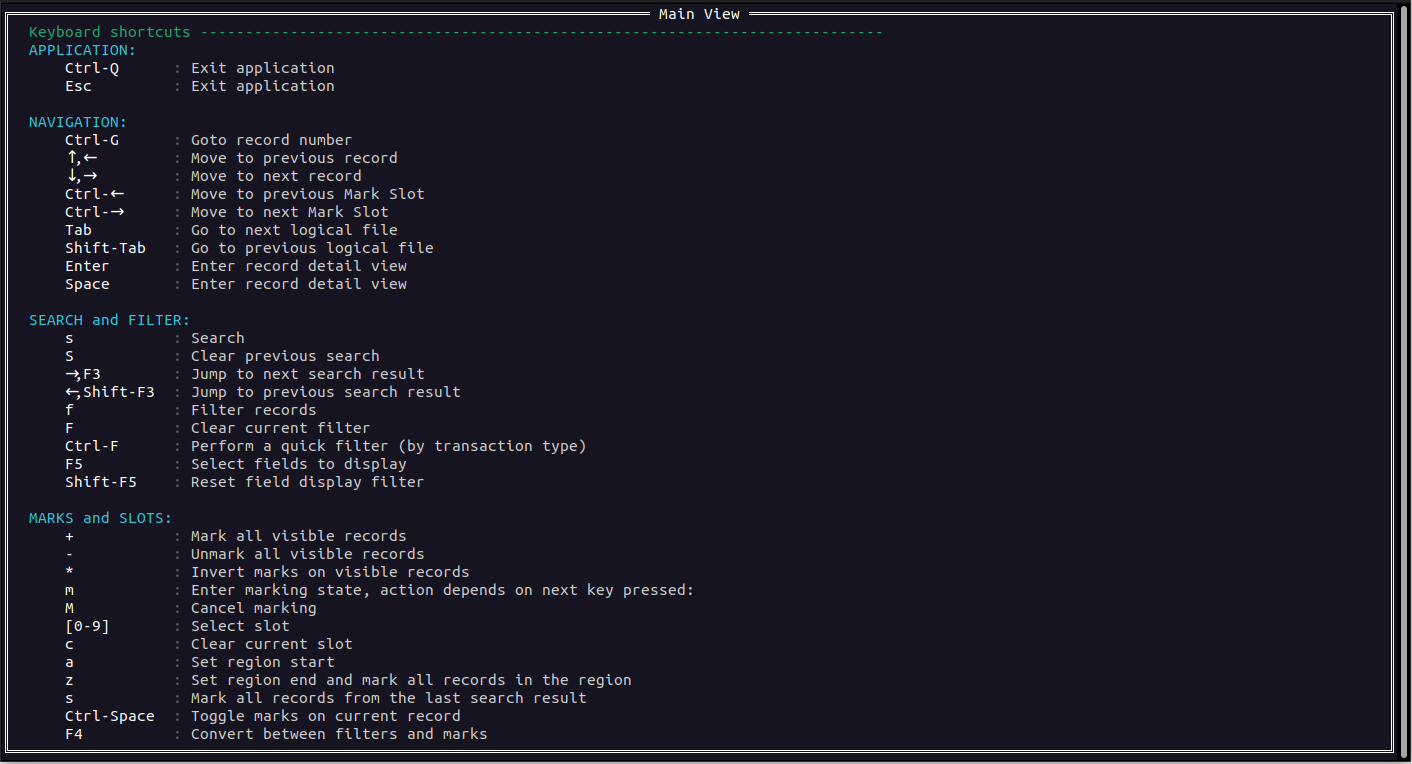
Pressing the F1 key we can access to a help screen about the current screen. For example, in this main screen, by pressing F1 we see the following help:
Now we will see the different actions available
Navigation
To move between records we can use the arrow keys, PgUp, PgDn, Home and End keys.
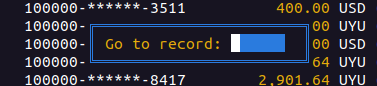
We can jump to a given record by presing Ctrl-G, where we will be asked for a record number, and pressing ENTER we will be positioned directly on that record as we can see here:
With the Tab and BackTab (Shift-Tab) keys, we can move through the different logical files (if the file contains more than one logical file, otherwise these keys will do nothing). The logical file we are working on will be reflected in the lower right part of the screen and also in the upper bar.
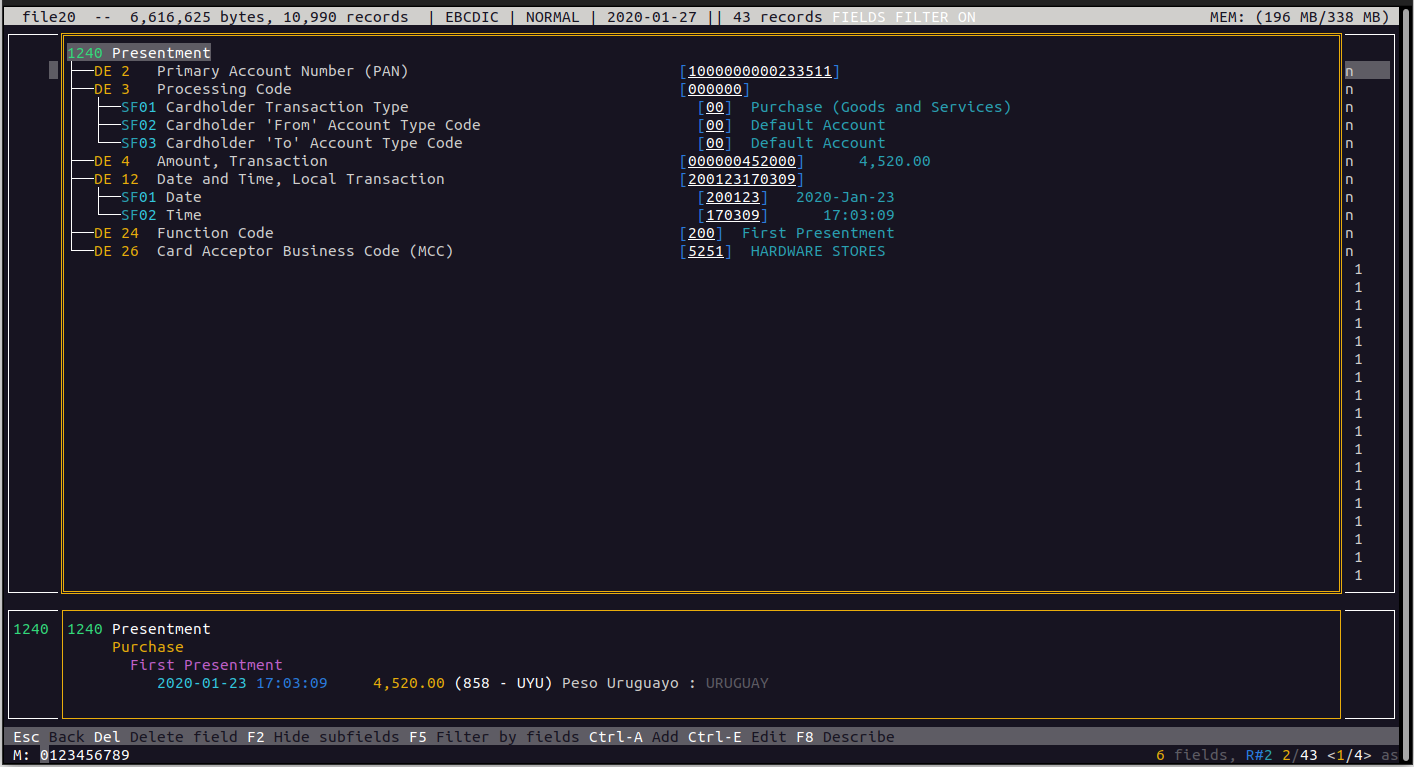
If we want to see the full details of a record, while being positioned over it, we just press the SPACE or ENTER key, and we will be presented with a new area where we will see the detailed contents of the record.
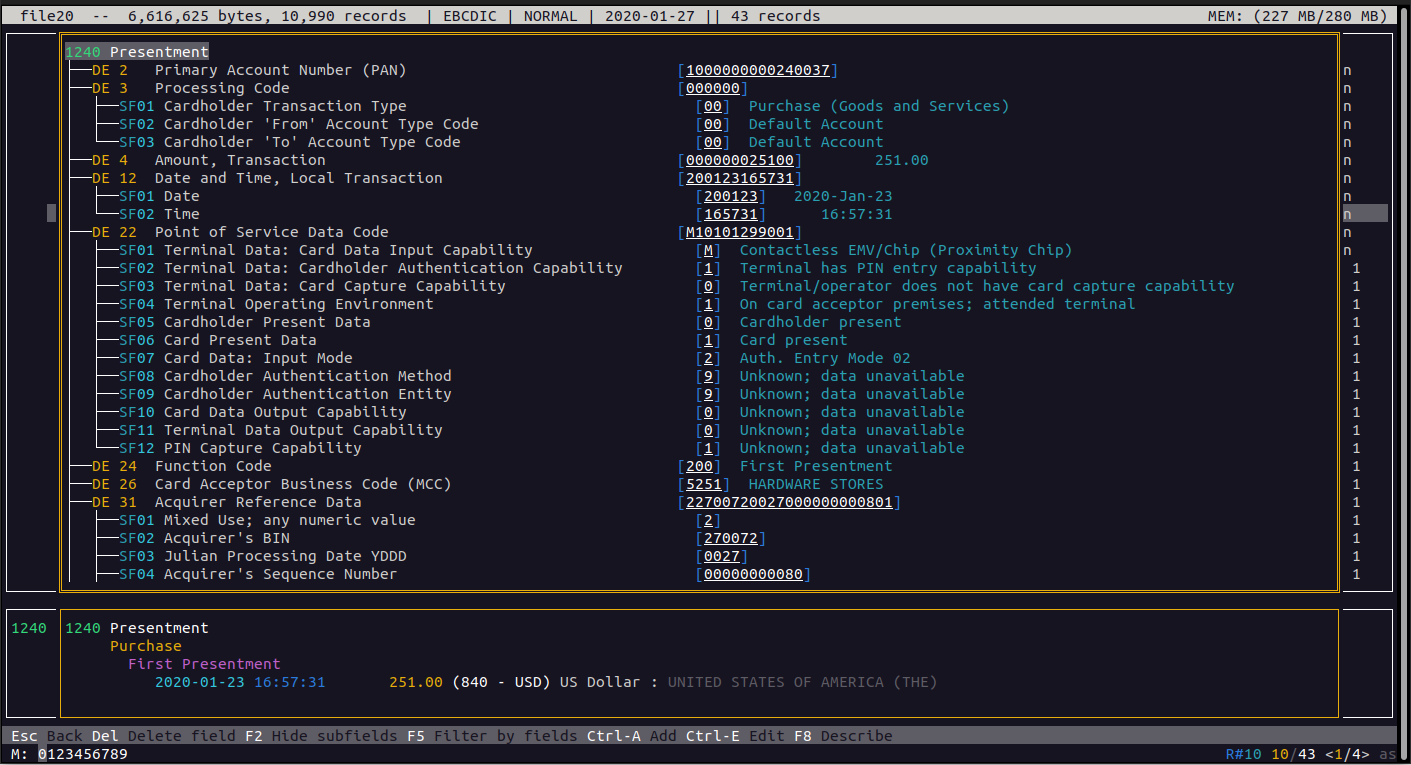
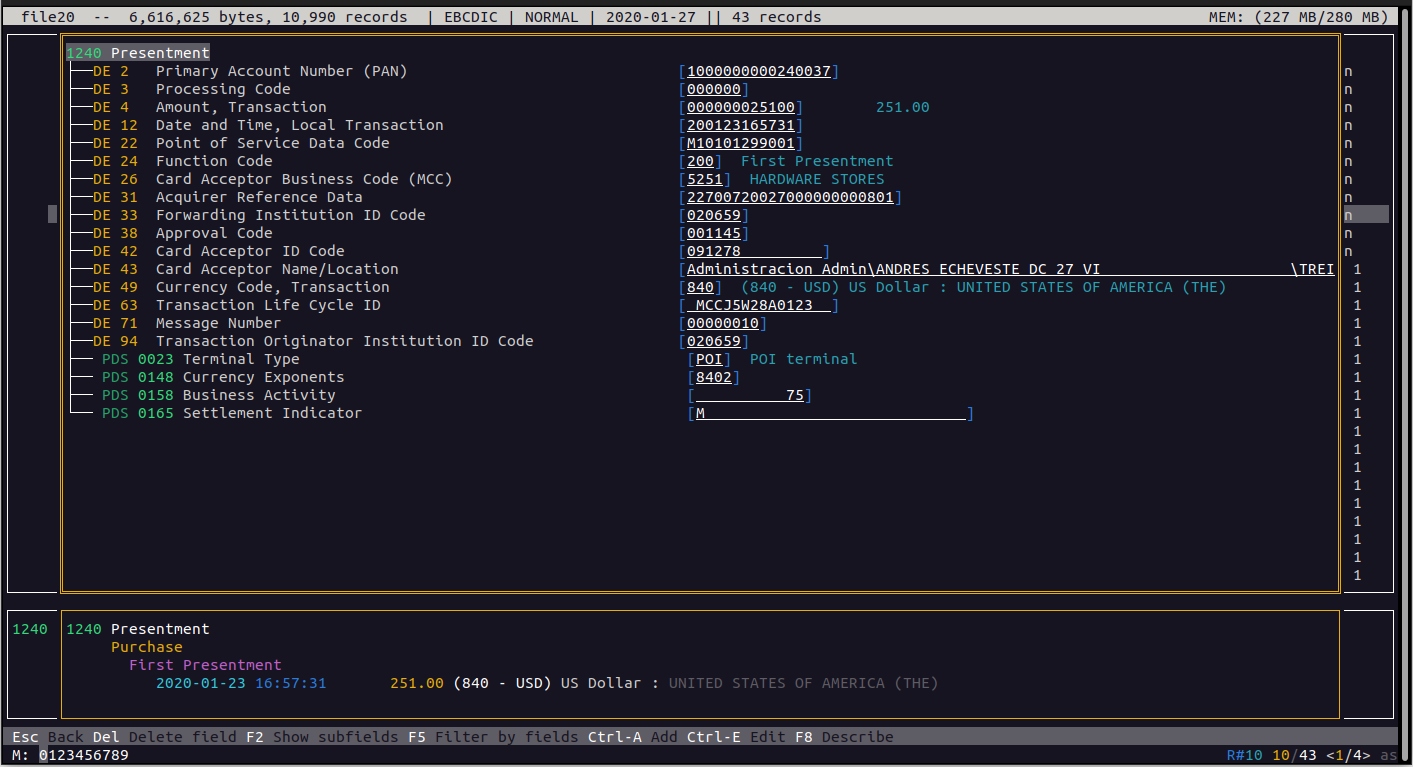
This view shows the present fields along with their description and values, and by default it also shows the subfields. In some cases the interpretation of the value is also displayed. If we want to omit the subfields and just see the main ones, we can change the view by collapsing the subfields by using the F2 key as a toggle.
If we move through the different fields, in the lower part we will see detailed information about that particular field. For example, if we move to field DE022, we will see at the bottom both the definition of the field, like the length and data type, and the value under a ruler to help us see different positions inside the value.

Pressing the Esc key returns back to the main view.
Search and Filter
This main view is really useful, but when we have thousands of records it becomes hard to find the one we need just by using the nagivation keys. In these cases we have a tool for searching and filtering. They are very similar because they let us find records by using search criteria, but they differ in that the normal serach just marks the matching records, while the filter only displayes the matching ones. It is very easy to switch between the search and filter mode as we will see later.
Let's try it. We will start making a global search. We want to search for the word “RUBEN” but we are not sure in which field it is present.
To enter the search, we press the “s” key (Search) and we are presented with a dialog where we can enter our search criteria

After entering the desired data, we press ENTER and the data is searched in the file. Matching records are marked and we can navigate between the results by using the left and rigth arrows to move to the previous or next matching result.
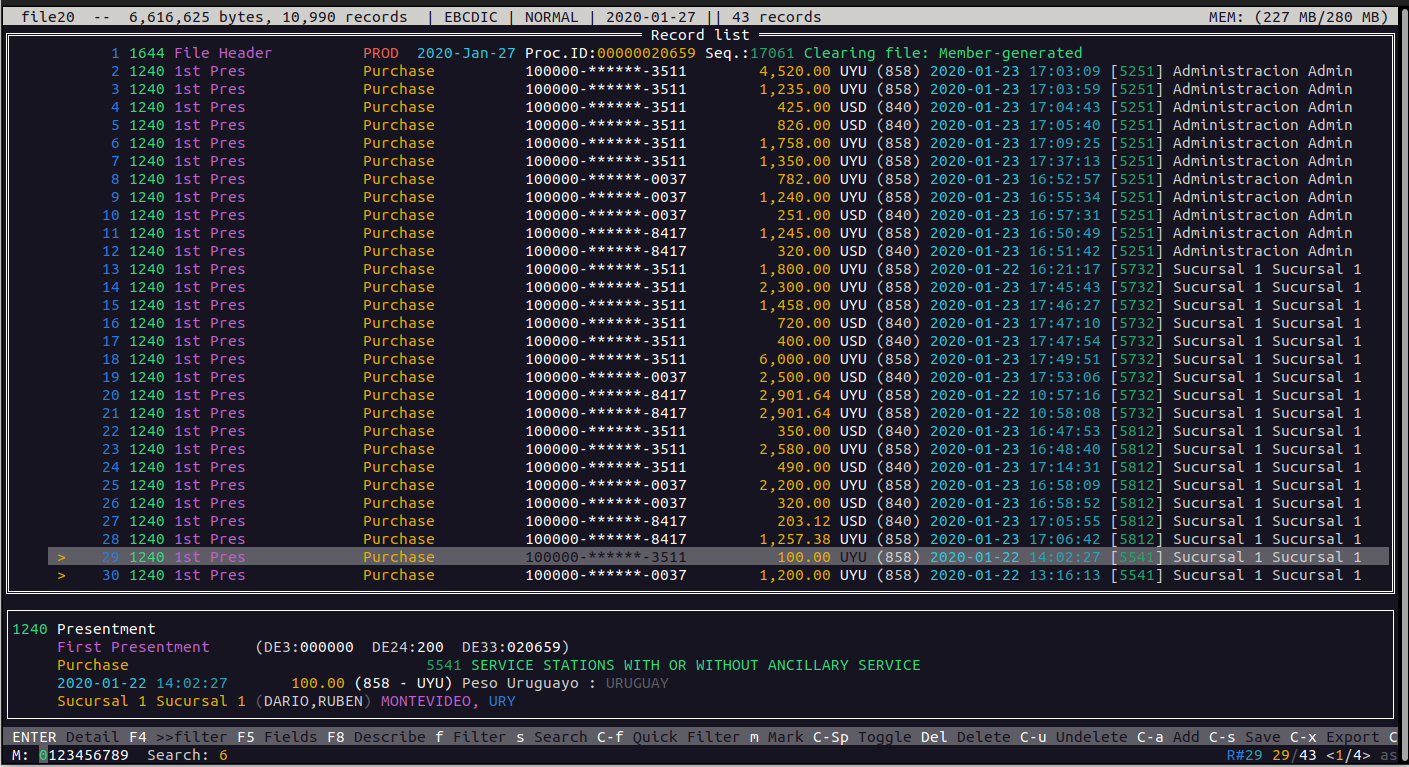
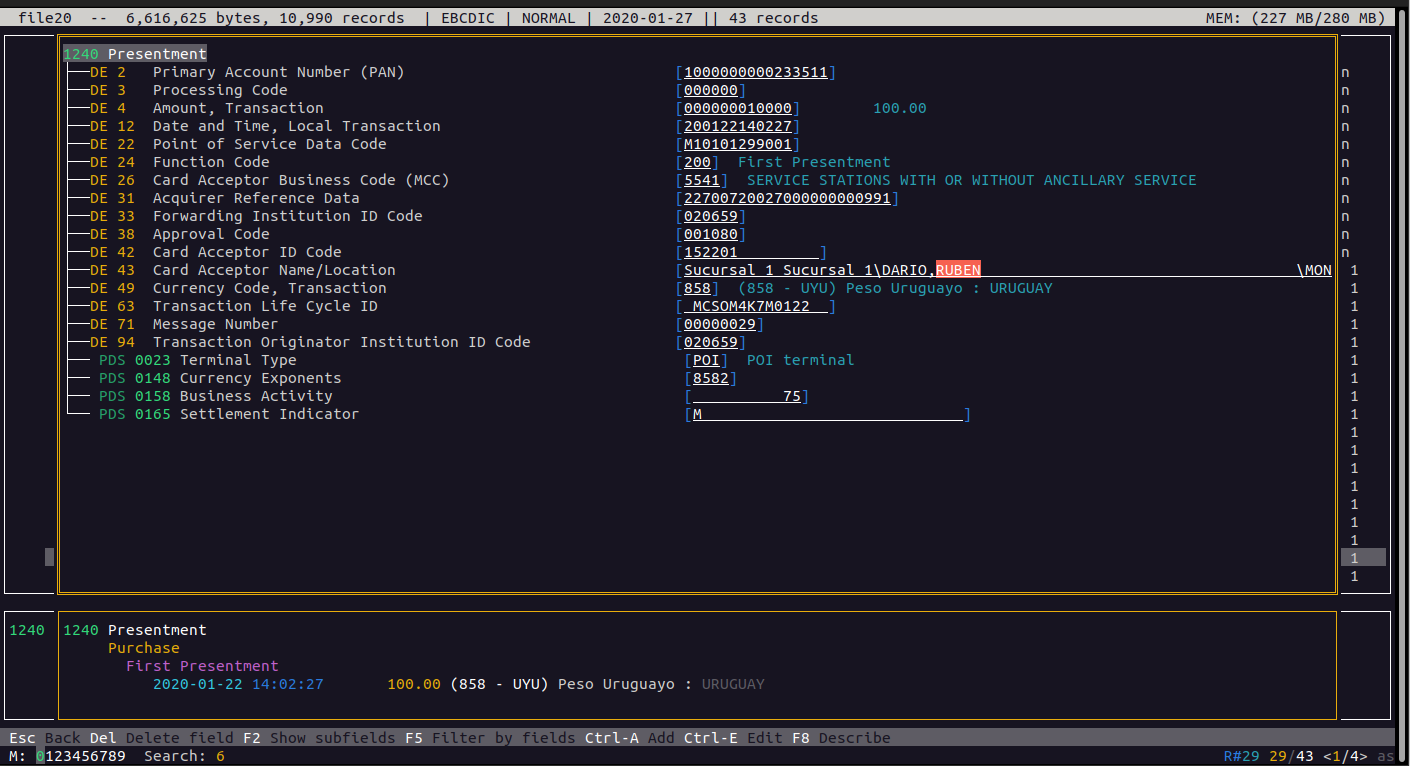
If we enter into the detailed view of the record (by pressing the SPACE or ENTER keys) we can clearly see the field where the value was found.
Now let's perform the same search but using a filter instead of a simple search. So, instead of pressing the "s" key, we press the "f" key (Find) and we will be presented with a similar dialog to enter the criteria

Pressing ENTER the search will take place, but this time we will only see the matching records, hiding the rest of the records
We can switch betweeen the search and filter results by pressing the F4 key
But the search engine is even more flexible. We can use the same conditions for searching as we used in the GREP command.
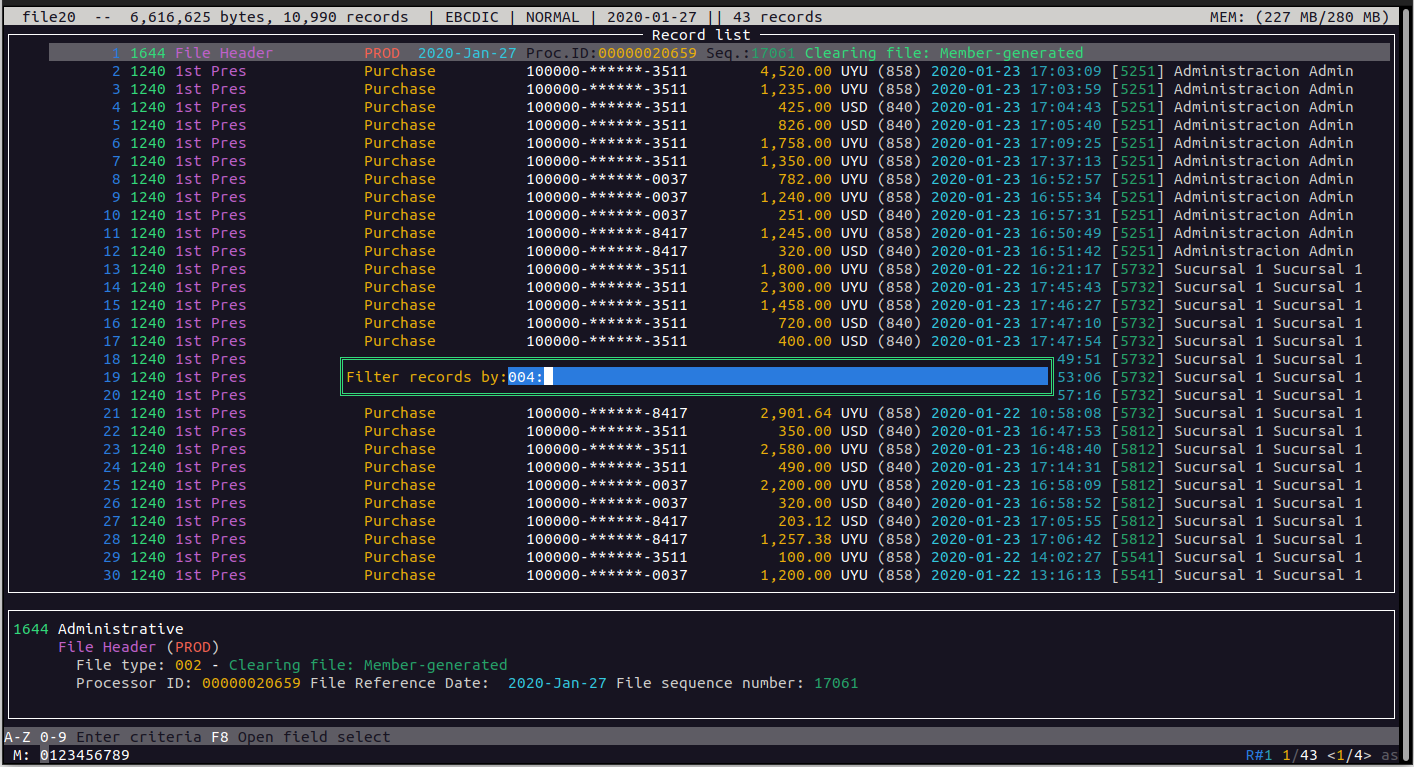
We can, for example, indicate the field where we want to search for the value. We must put the field indicator and the value to search separated by a colom (":")
Let's search again the transactions that have the word “RUBEN”, but only the ones that have been done between the times 14:00 and 15:00. We also know that the field where the time is located is DE12S02, and as we can use regular expressions, we will perform the search like this:
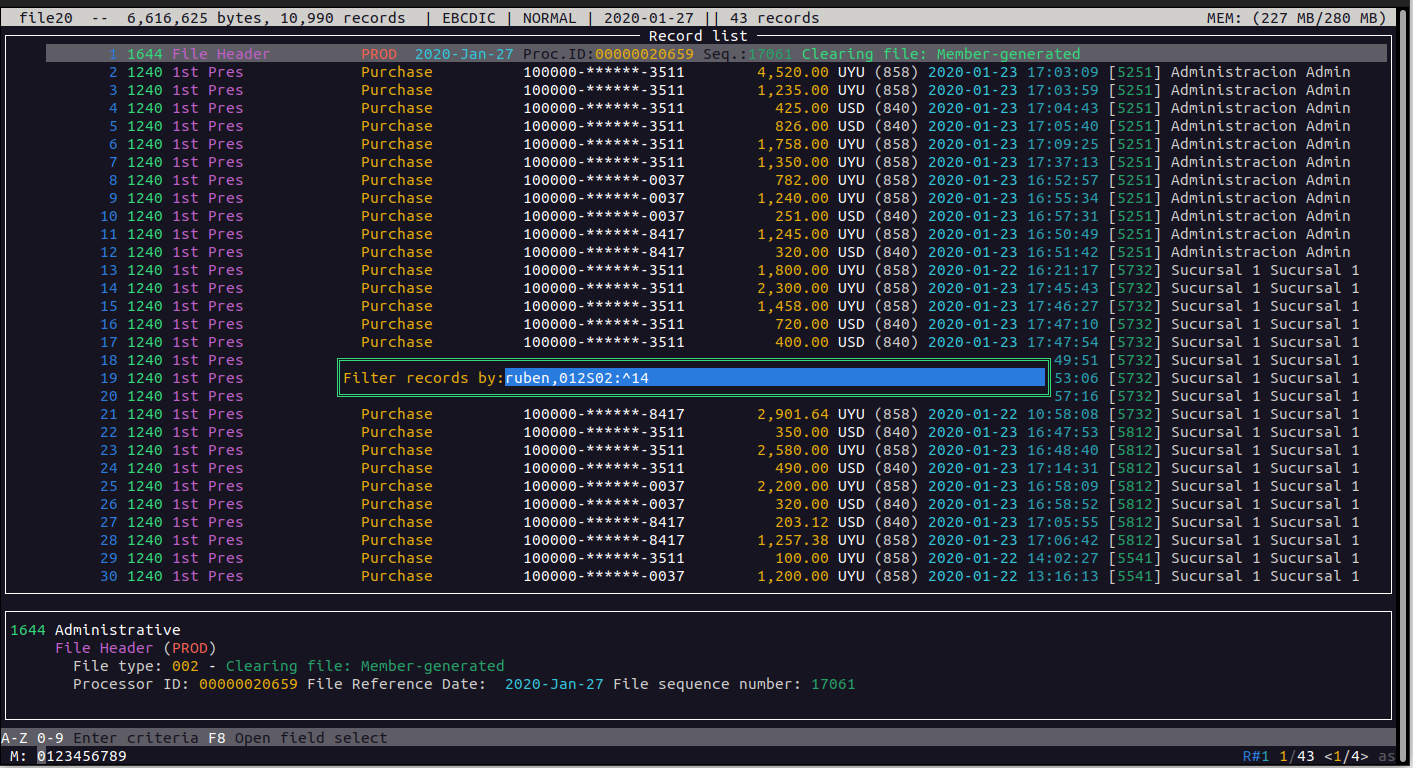
Here the criteria is, search for the word "ruben" in all fields, but with a value in field DE012SF02 that starts with “14”. As these two conditions are separated by a comma, both must be true to consider the record a match
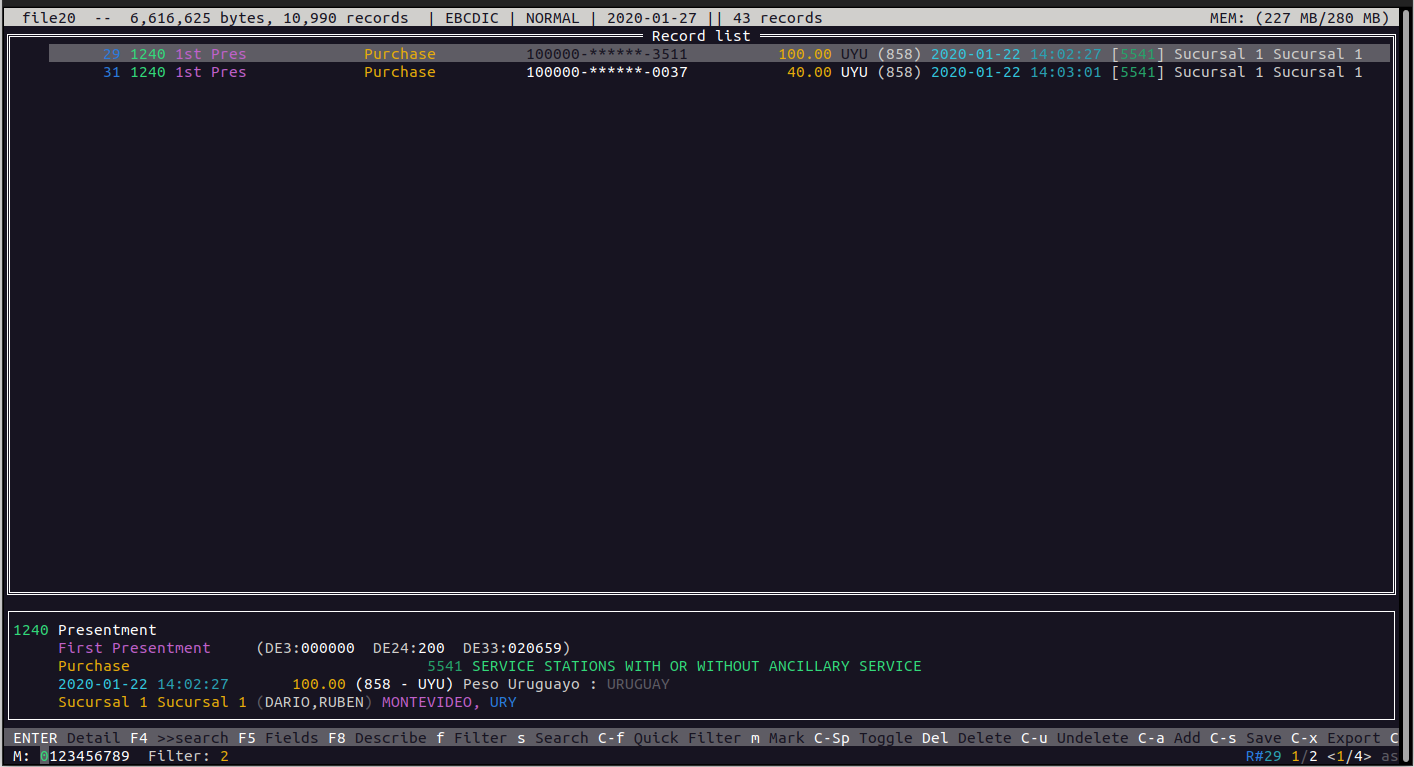
Now we only see two records.
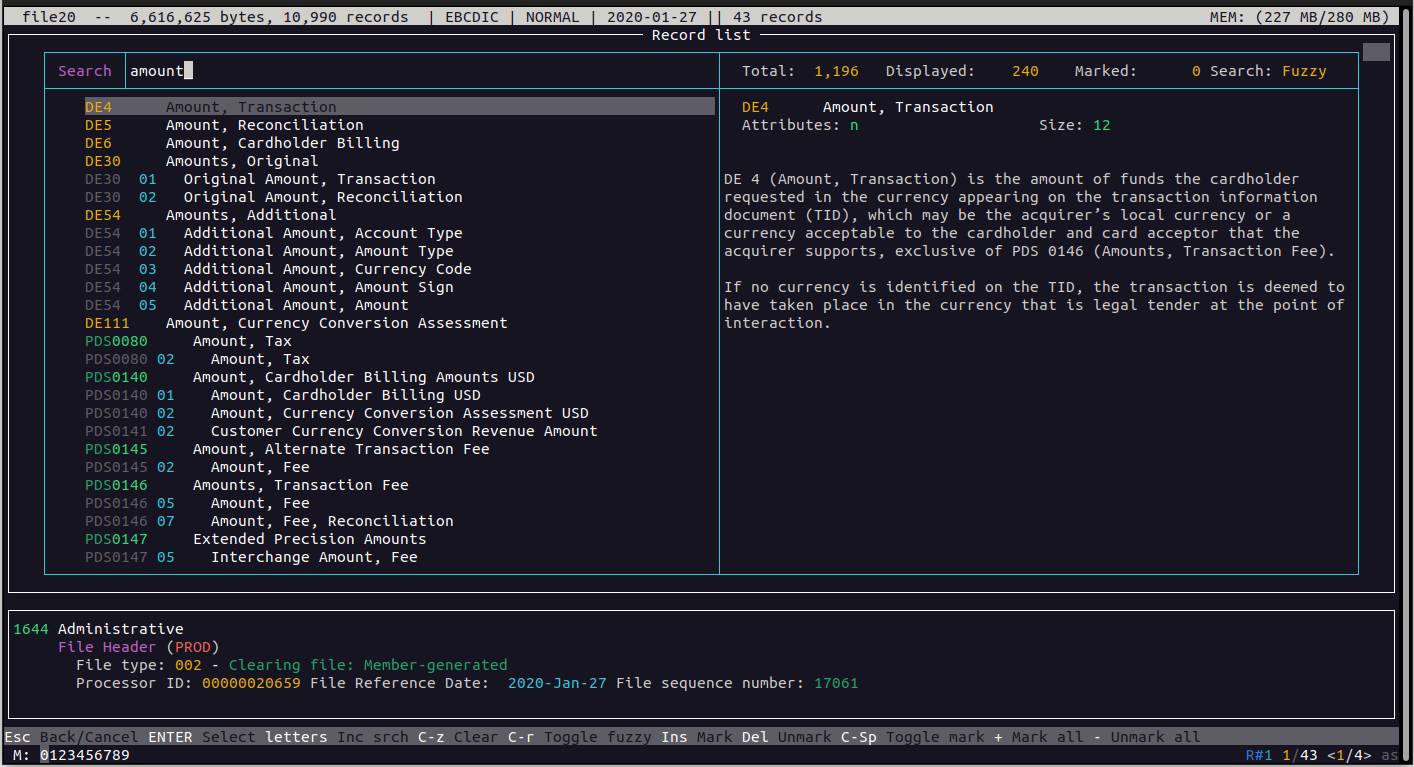
Let's see another example. Let's suppose we want to search for an amount of 40
We can start the search as a filter by pressing the "f" key, but suppose we don't remember the field that holds the amount of the transaction. In this case, when we are entering the condition, we can press the F8 key to get help by seeing a list of all fields. Here we can just write the word "amount" and we will be presented with the fields that contain that word in their description.
We clearly see that the transaction amount is field DE4, so we select it and press the ENTER key
With this now we have the field id automatically inserted in the criteria field and also the colon is added, so we just need to enter the value to search.
We enter the value 40 and press ENTER
We see that we are getting more records than expected. This is because all of them contain the value "40" somewhere in the field, but that is not what we want.
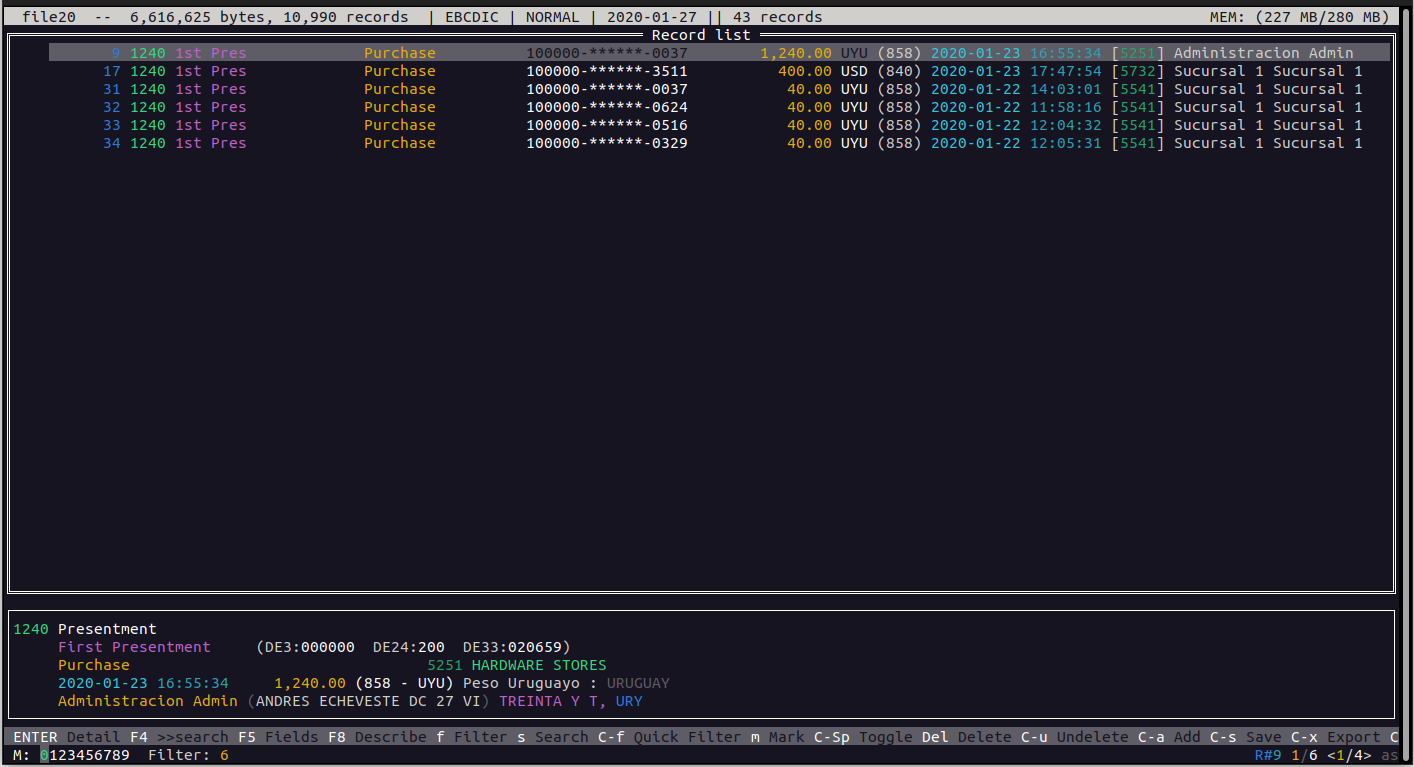
We know that the amount is stored with two decimal positions for this currencty, and that the field is filled with zeroes on the left up to the field length. So, we can just use a regular expression to force this condition. We enter this:
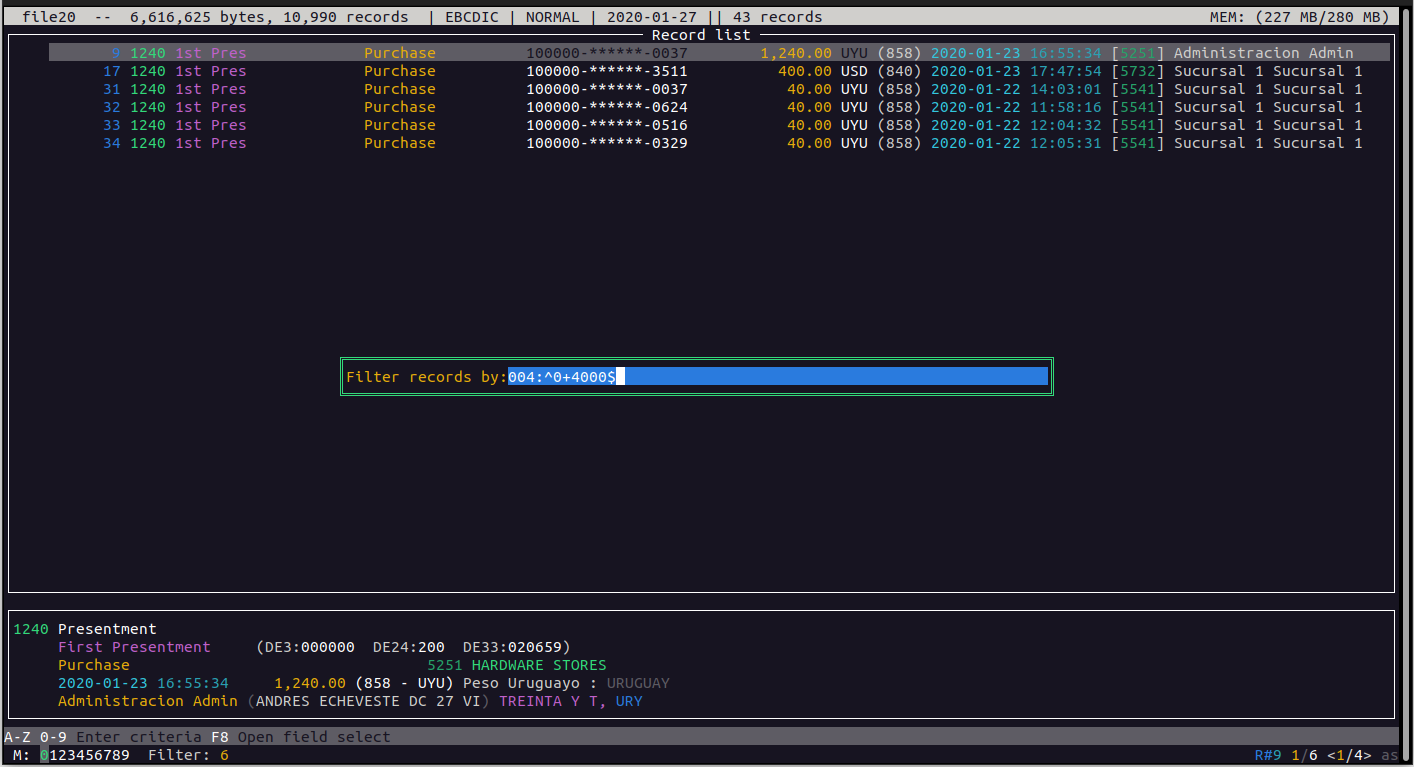
And now we are just presented with records with an amount of 40.00
If we sill have too many results, we could continue refining the search using other known values, like the time, merchant, PAN, etc.
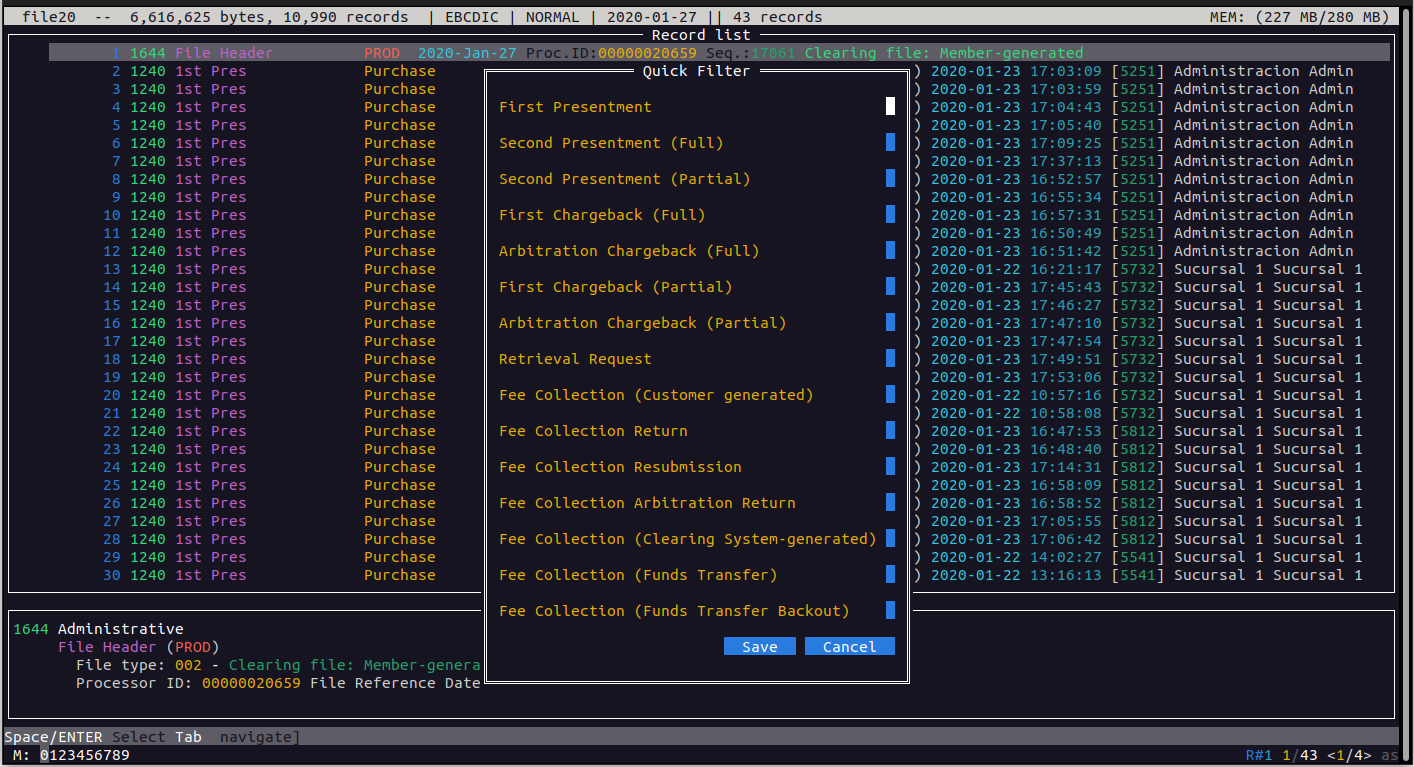
We also have another quick filtering option which is accessed by using the combination of Ctrl-F
Here se are presented with a series of options where we can select the transaction types we are interested on without the need to search for the corresponding fields and codes.
Display filters
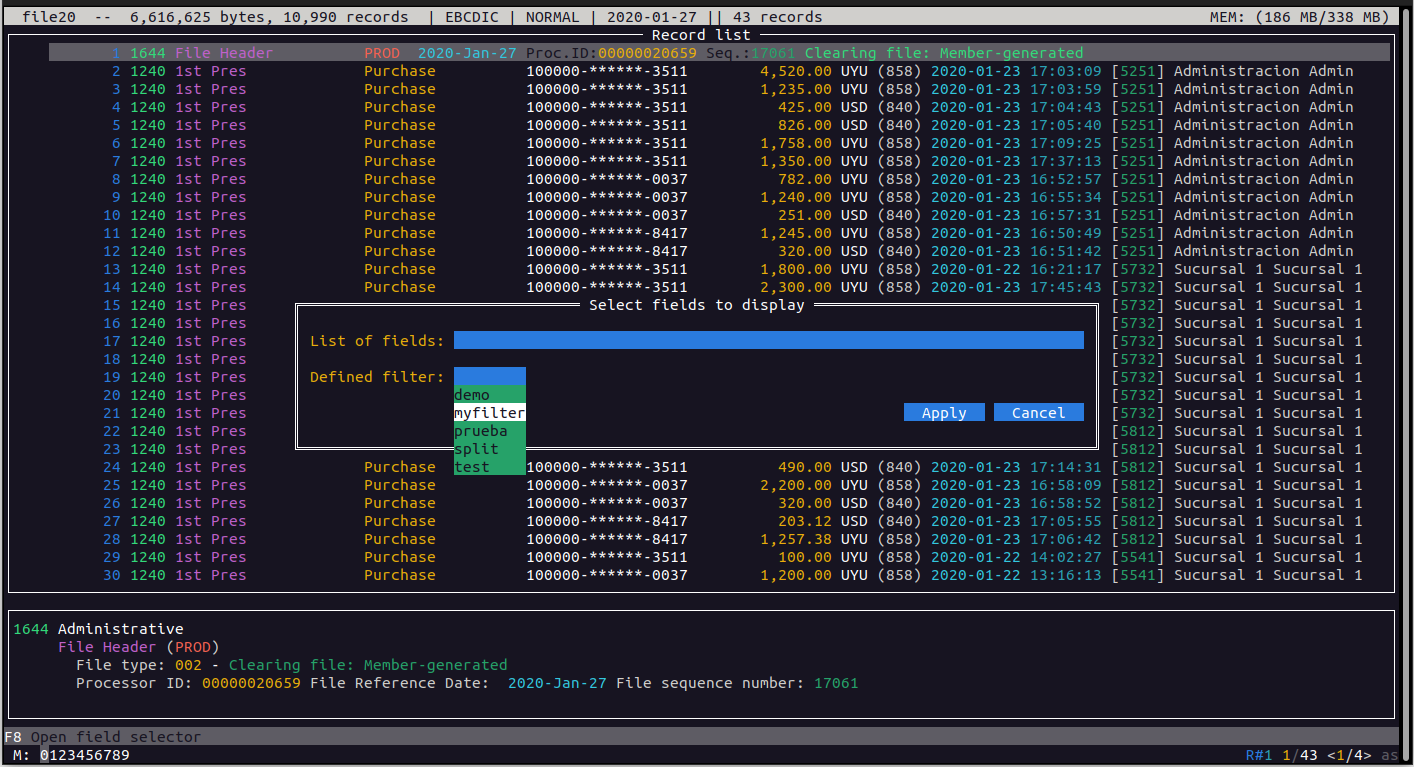
We have another filtering type and that is to decide which fields we want to display in the detailed record view. Maybe we just want to see a couple of Data Elements and having all the fields visible is not practical and is also confusing. For this we have the F5 key where we can select the fields we want to display and optionally select one of the stored filters like we saw in the FILTER command.

Now, seelcting the area named “Defined filter” and pressing the down arrow, we will be presented with a list of defined filters and we can shoose one of them
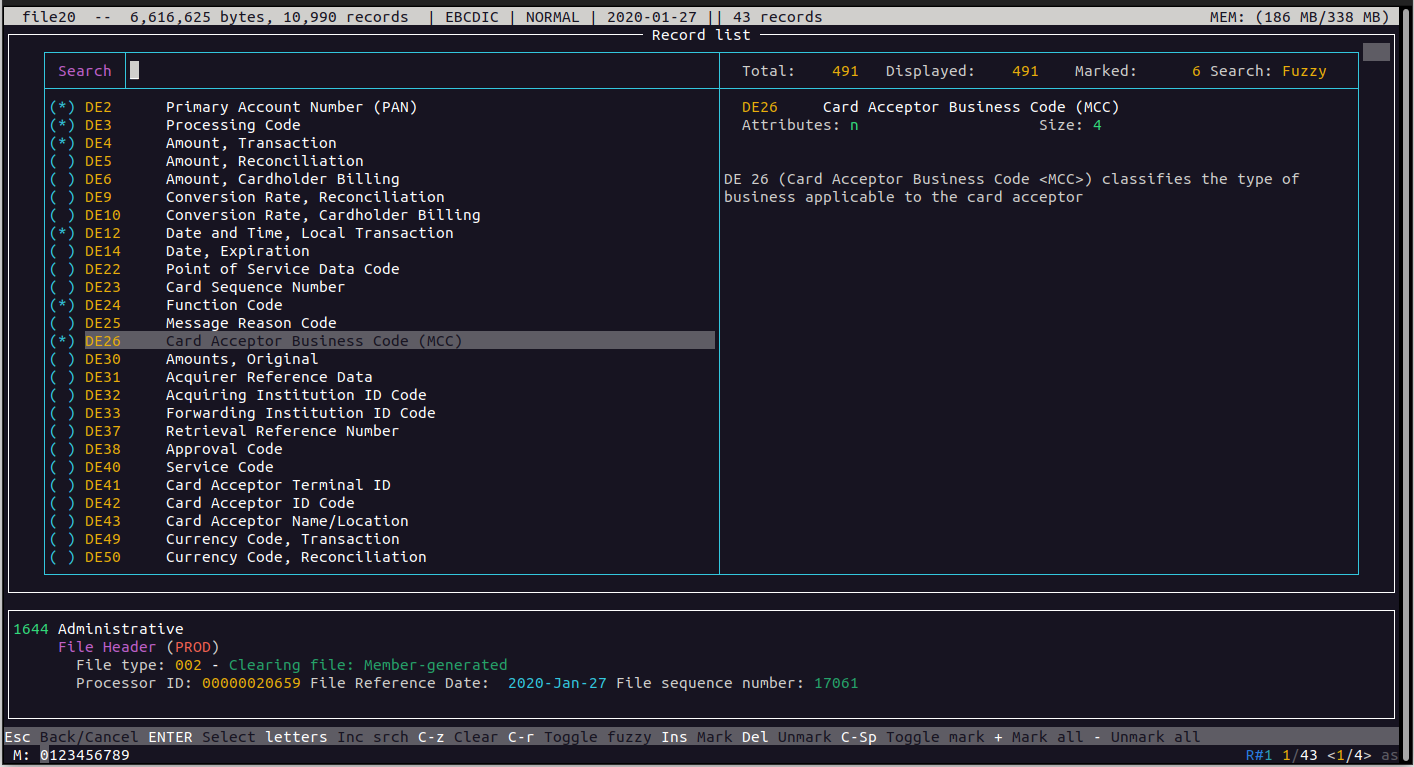
Like all places where we can enter a list of fields, we can press the F8 key and get a list of available fields. In this case, to select multiple fields, we can select each one by pressig Ctrl-Space, ans when we have all the desired fields marked, we just press the ENTER key which returns the full list of selected fields
Now, pressing ENTER...
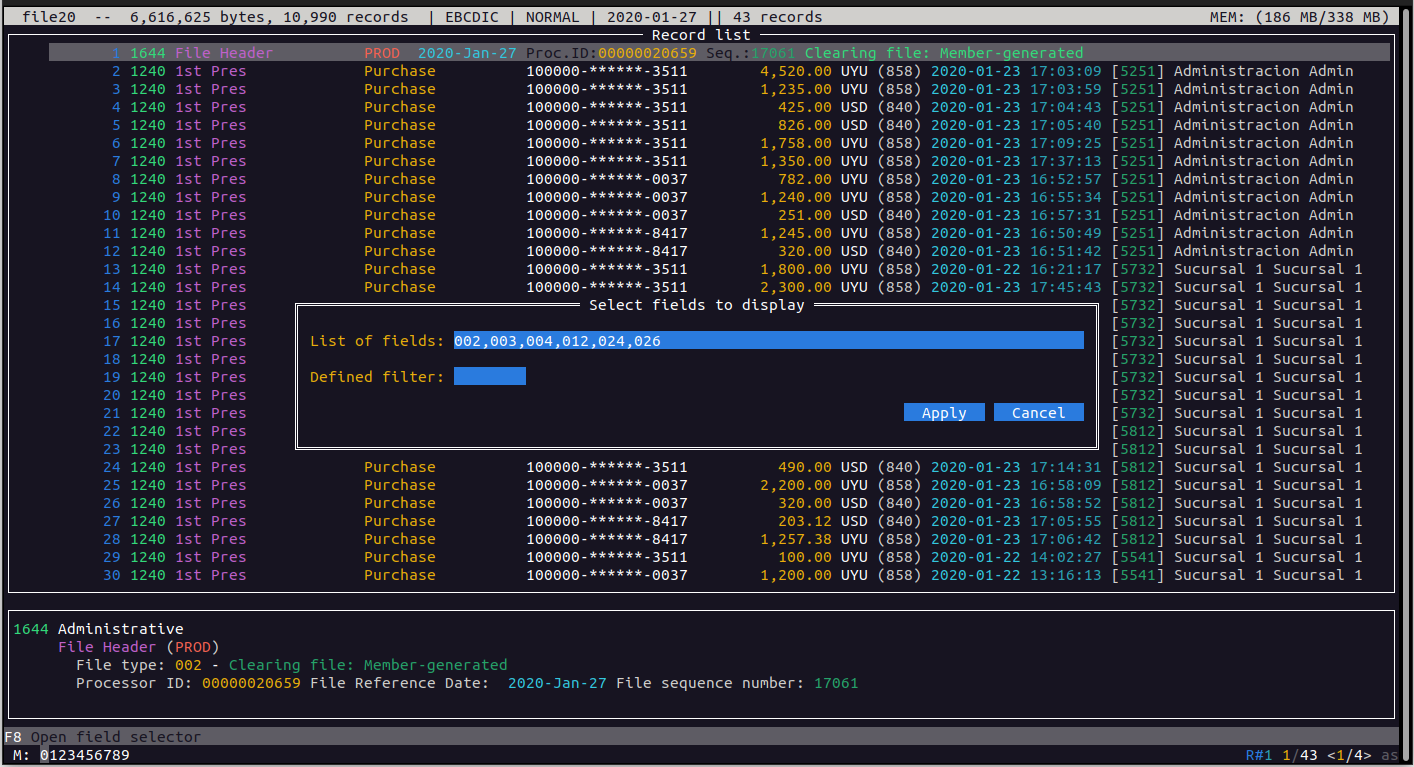
Next, we press the "Apply" button, and when we enter the detailed record view, we will just see the selected fields
To remove the field filtering view, we just press Shift-F5
Mark records
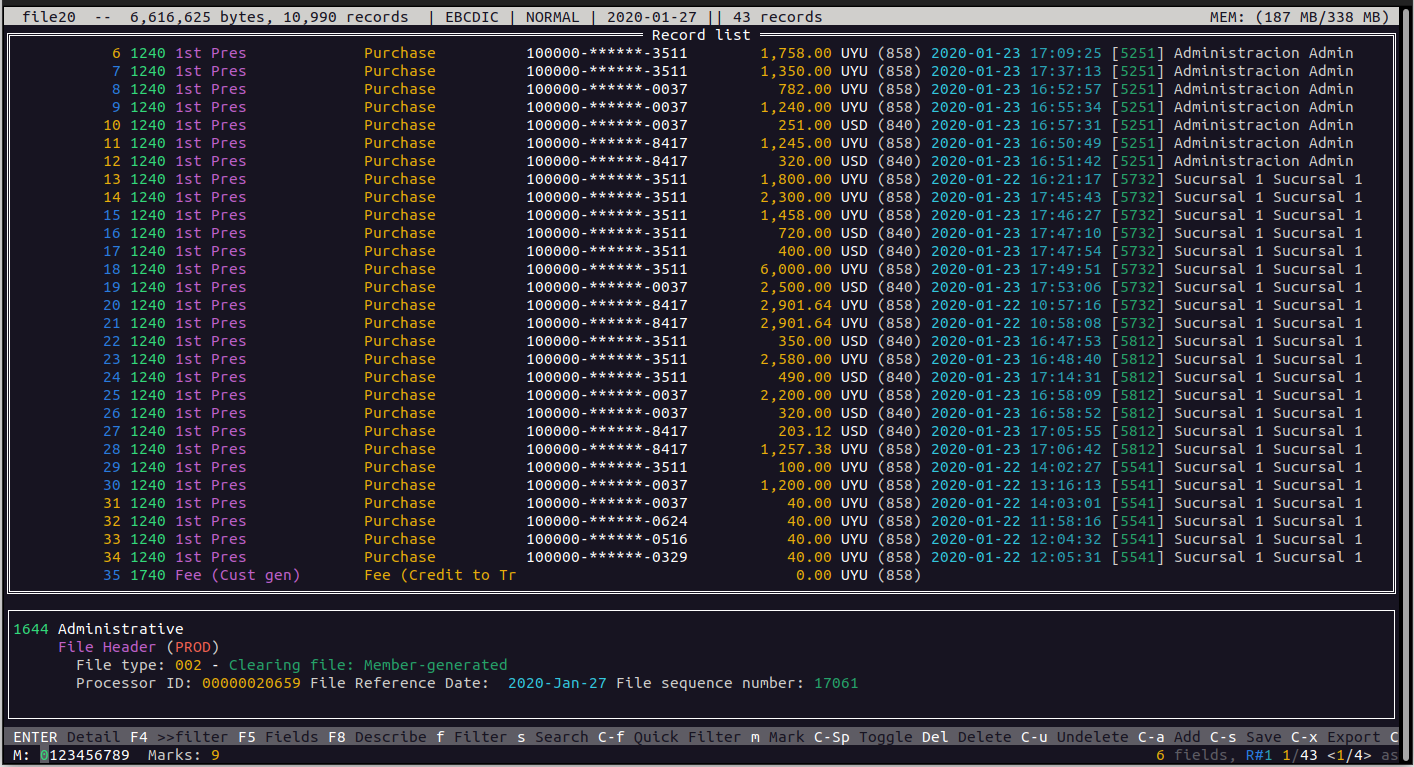
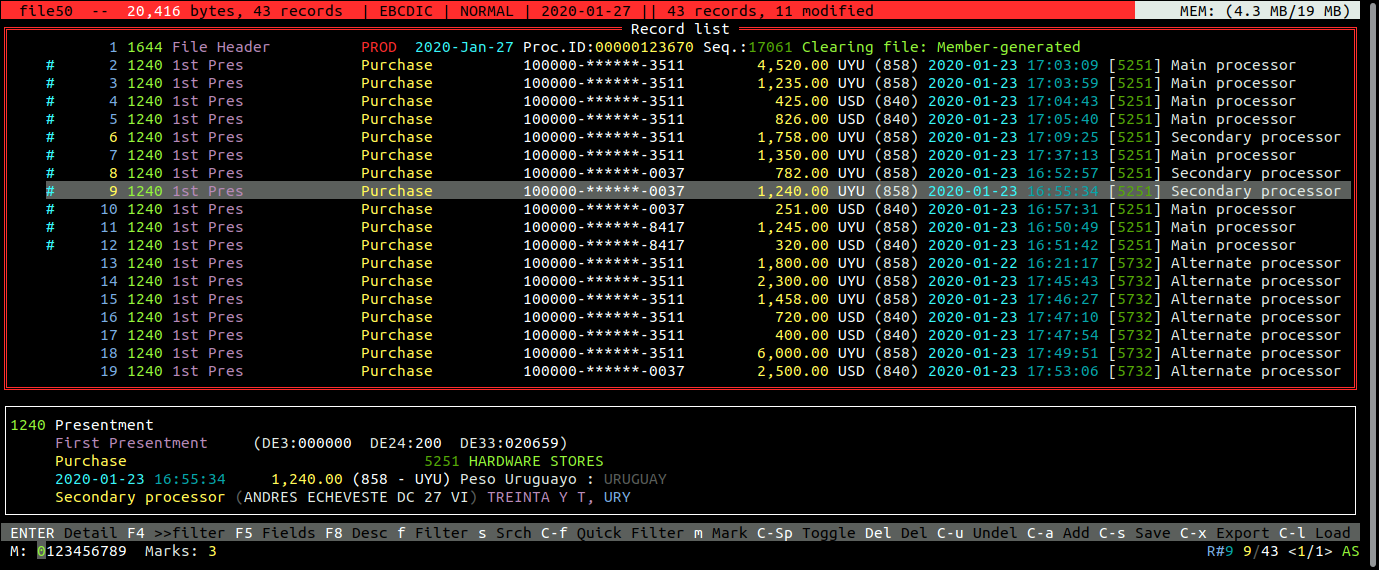
We can mark specific records to perform certain operations over them instead of performing the operation over all the records. First we will see how to mark records. The first option is to just navigate to the desired record and press Ctrl-Space. In this example we will navigate to record number 6 and press those keys. We see that the record is marked with a different color which indicates that it is already marked. To unmark the field we just press Ctrl-Space again.
We observe that in the status bar (the bottom one) and on the left, we see the text “Marks” followed by the number of marked records, which in this case is just one.
We can also mark a range of records. For example, if we want to mark records 10 to 14, we navigate to the first record in the range (record 10 in this case) and we press the "m" key followed by the "a" key.
Next we move to the last record in the range (record 14) and we press the keys "m" and "z". We can see that all records in between are also marked. We can also observe that the previously marked record is still marked, and that is because the actions that mark records are additive, so it does not unmark previously marked records.
If we want to remove the marks over records we can do so one by one by navigating to the desired record and pressing again Ctrl-Space (Which is a toggle combination).
We can also press the "-" key to remove all marks at once.
Another option is to use the filter to just make the matching records visible, and press the "+" key that will mark all visible records at once. After that, we can just press Shift-F to clear the filter, but the marks will remain. So let's mark the records we have previously found with the amount of 40.00
First, we apply the filter and we press the "+" key followed by Shift-F5
Delete records
Pressing the Del or Ctrl-D keys we can delete records from the file. If no records are marked, we will delete the current selected record, otherwise, all the marked records will be deleted.
Before actually deleting the records, we will be presented with a dialog to confirm the operation, where we will see the number of records to be deleted.
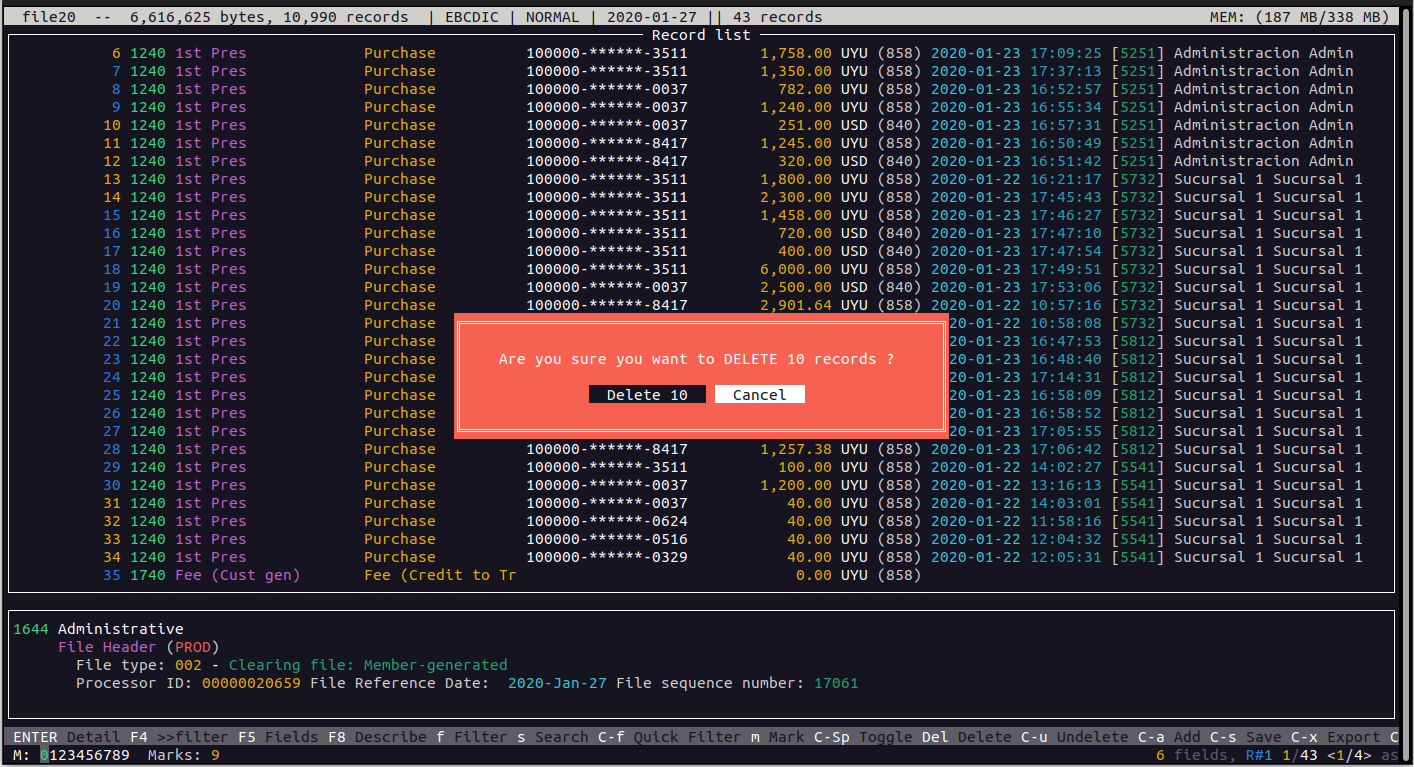
By pressing the confirmation button, those records will be deleted, and as a reminder both the upper bar and the information area will change their color to red. Also in the upper bar we will see the number of present records and the number of delted records.
We have to understand that all these actions are non destructive, that is, the original file will never be modified. To save the changes we need to write the data to a new file as we will see later.
Recovering deleted records
Even that we need to confirm the deletion of records, we can realize that we have deleted some records that were not to be deleted. In this case and before quitting the application, we can recover the deleted records by pressing Ctrl-U
We are then presented with a new screen where we see all the deleted records, so navigating and pressing ENTER on any of them, that record will be removed from the deleted list and restored in the main view.
Record modification
While in the record detail view (after pressing ENTER or SPACE over any record from the main view), we can modify the fields in several ways.
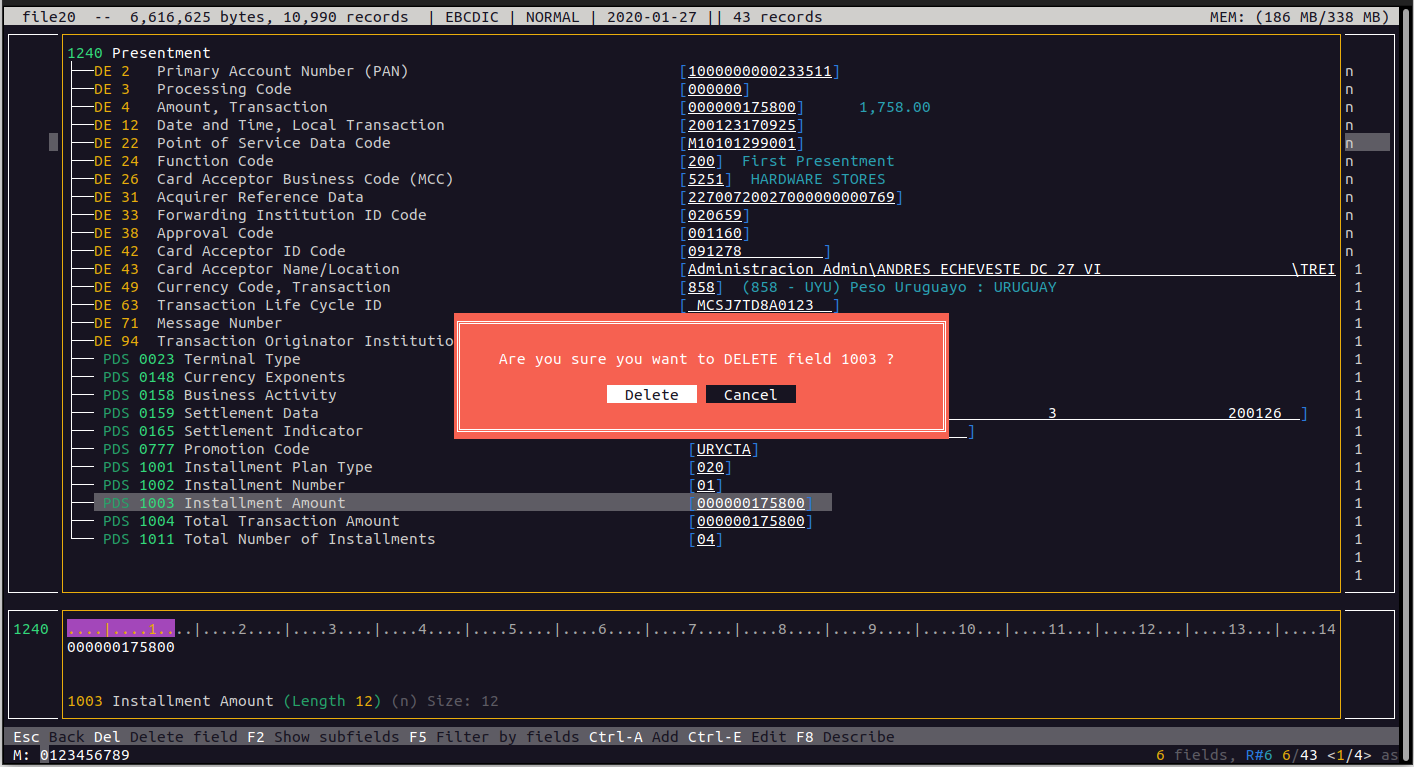
The first thing we can do is remove a field from the record. For example, we will remove field PDS1003. We just navigate to that field and press the Del key.
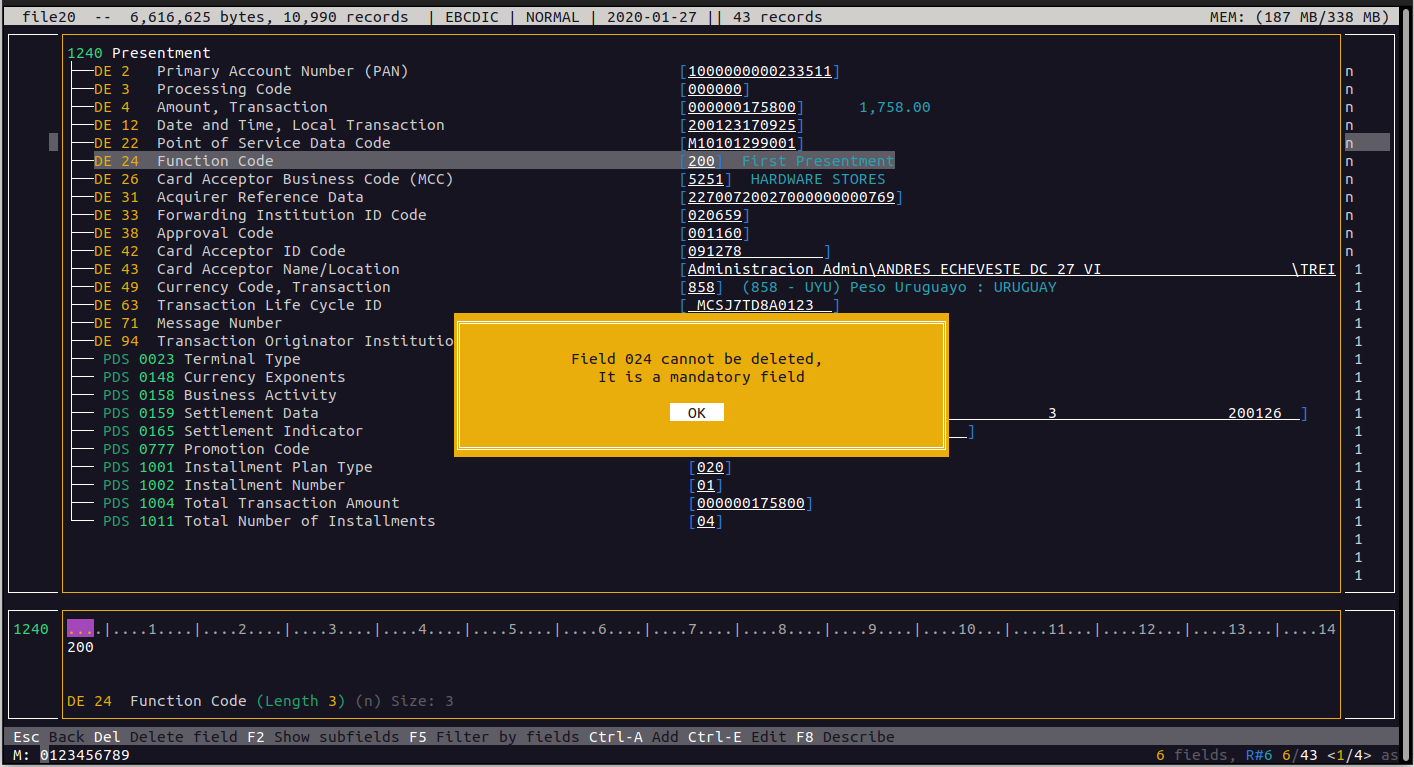
By pressing the "Delete" button, the field will be eliminated from the record. Please note that we are not allowed to remove mandatory fields. For example, if we try to delete field DE024, we will not be allowed to do that.
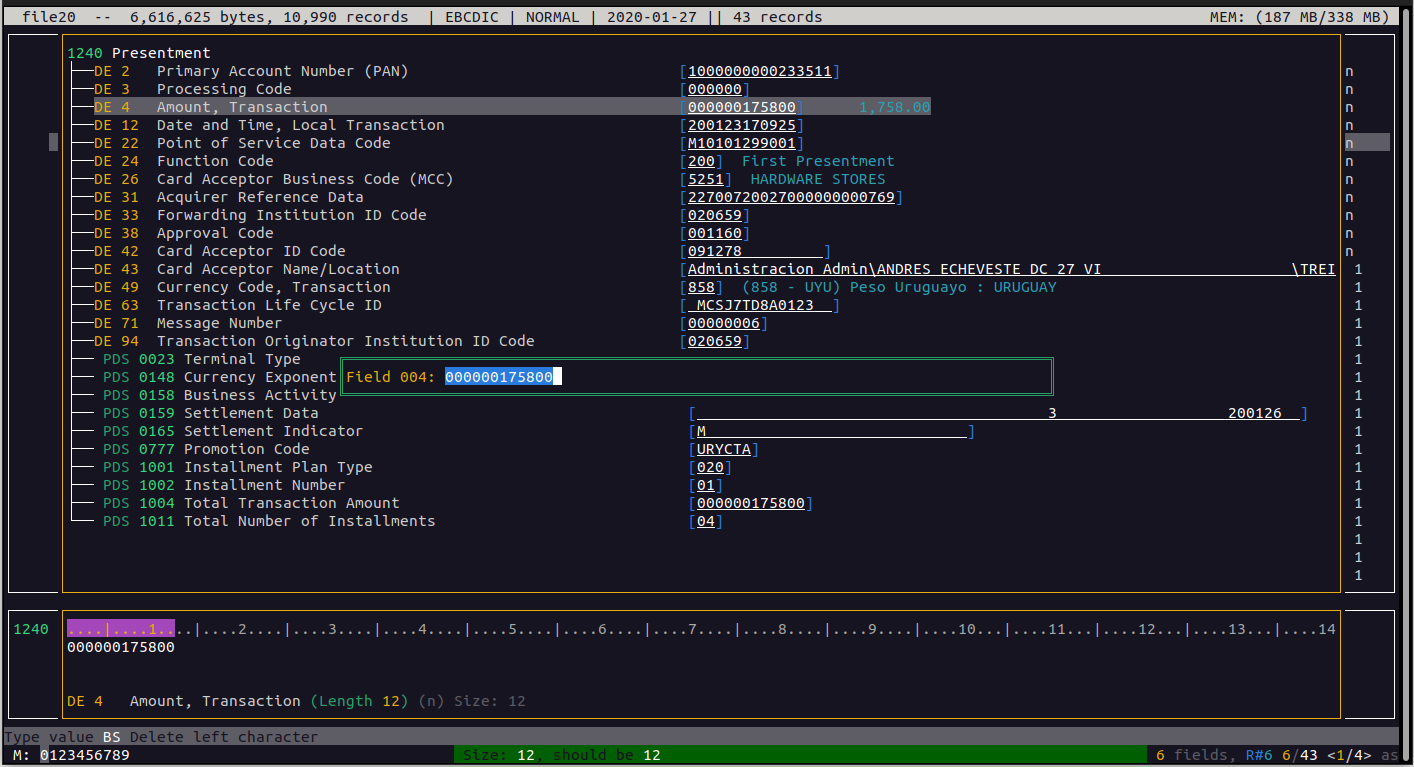
Another option is to modify the value of a field. Let's change the amount, from 1758,00 to 5100,00
So, we position over field DE4 and we press Ctrl-E

We modify the value and press ENTER, which effectively updates the record with the new value

We see the new value and also the field description changes its color to visually indicate that this field value was changed.
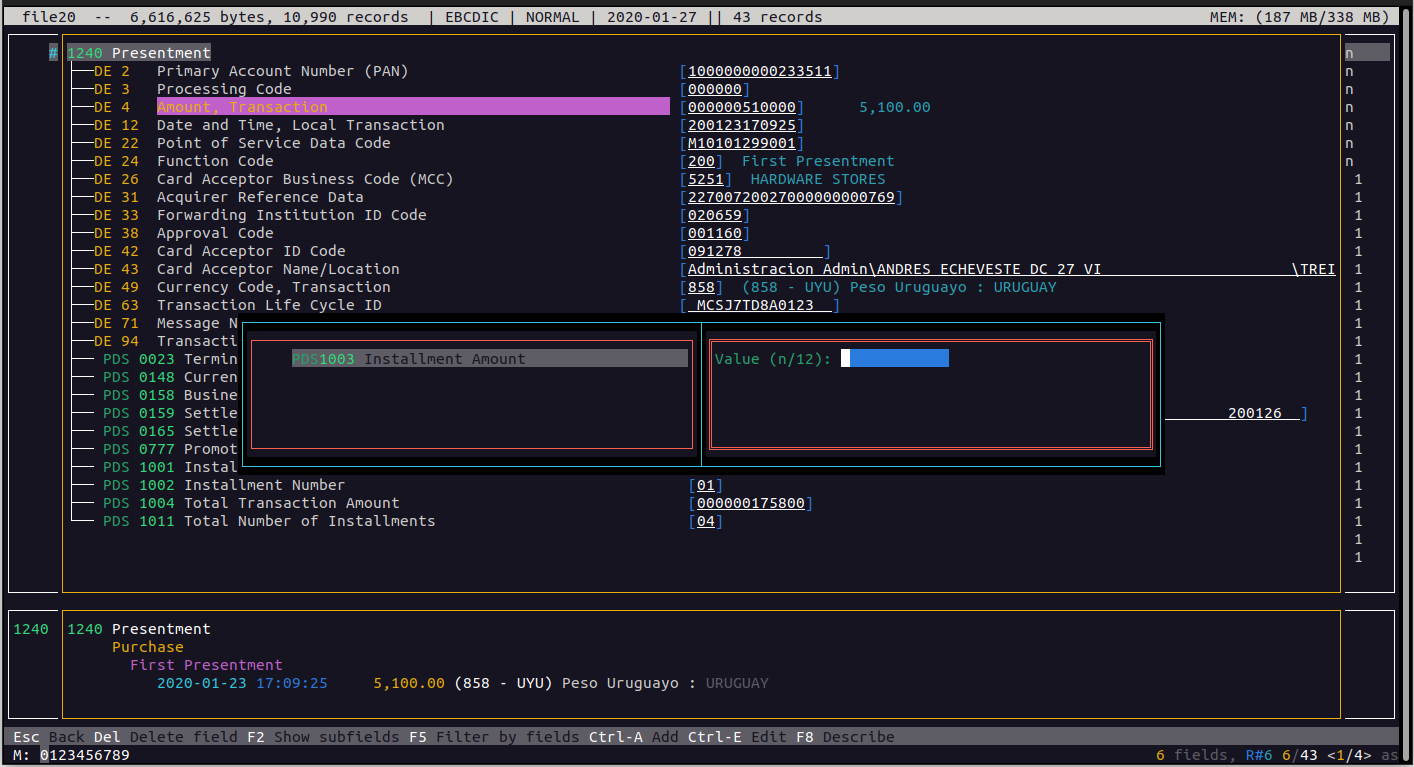
Another operation we can do is to add a field. To do this we press Ctrl-A and a list of fields we can add is shown (note that the existing fields are not present to avoid duplicates). For example, let's choose field 1003 and press ENTER
Then we are presented with a dialog were we can see the list of fields we can add, and to the right a place where to enter the value. We also see the data type for the field and its length (in this case numeric with a length of 12)
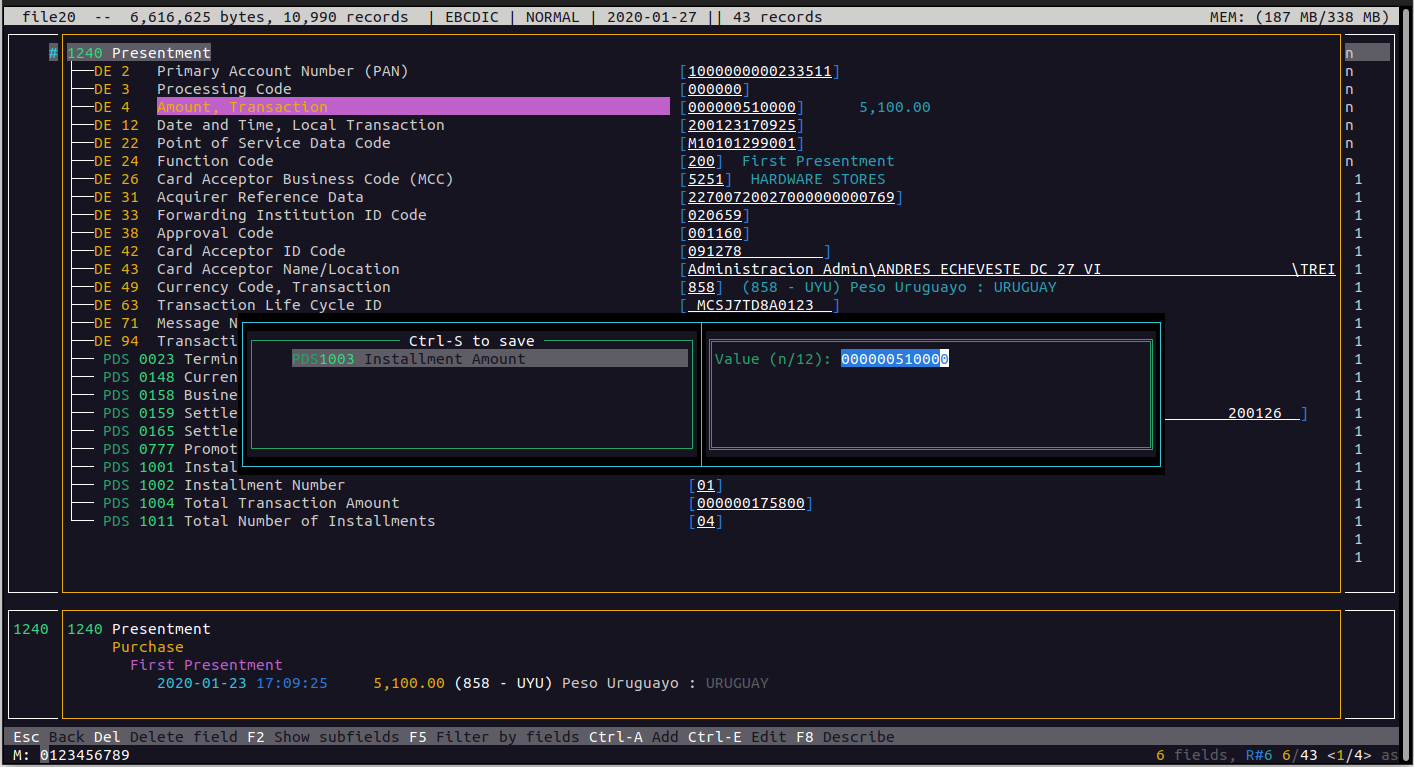
Here we put the desired value and when the new value is validated, the frame color is changed into green to show that we have a valid value.
At this time we can press Ctrl-S to save the changes and add the new field
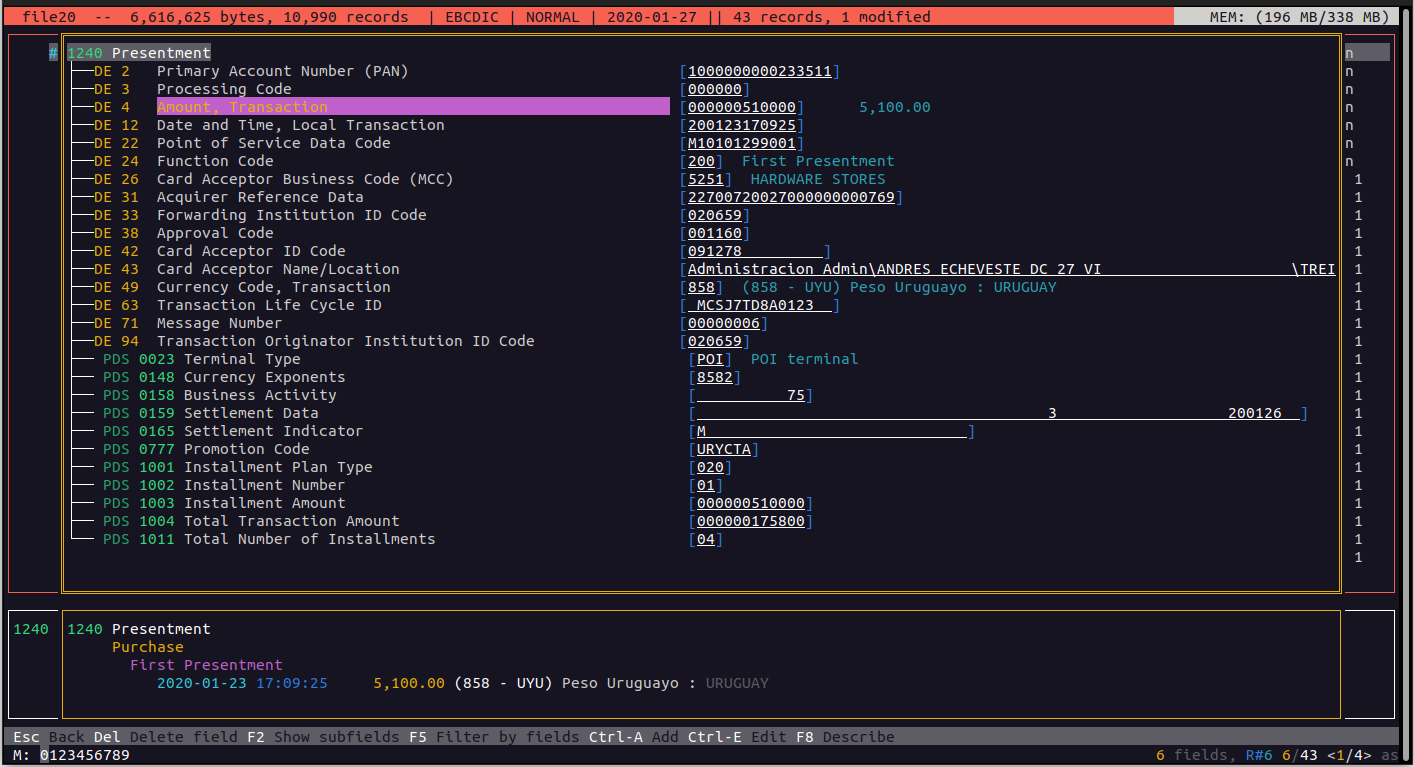
Again, we can see that the upper bar changes its color into red as a reminder that the file has been modified, and the frame of the detail view turns into yellow for the same reason.
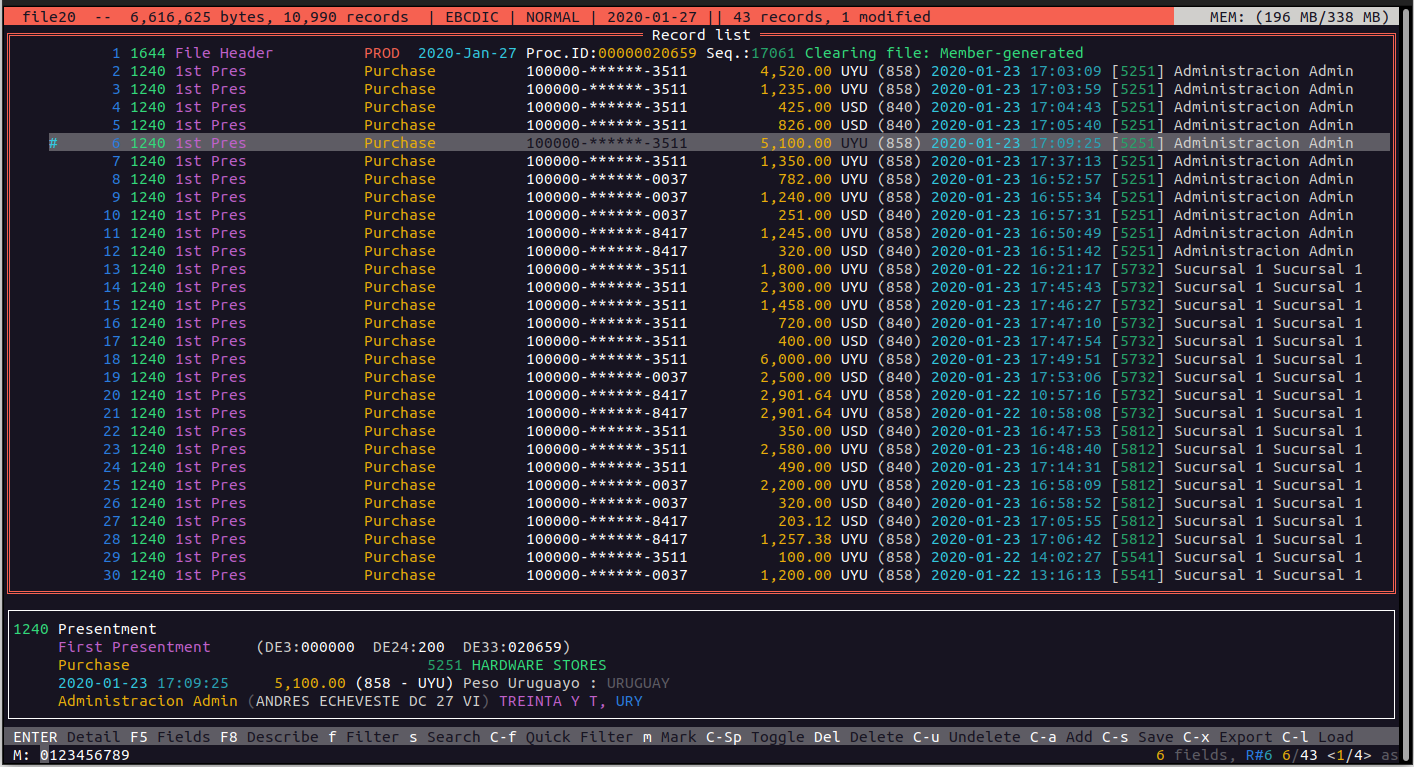
Again in the main vew we see that record 6 is maked (with the # character) indicating that the record has been modified.
Search and Replace
Pressing Ctrl-R we are presented with a dialog where we can enter a value to search and the new value. The search part accepts regular expressions and we can also specify the fields where to perform that search.
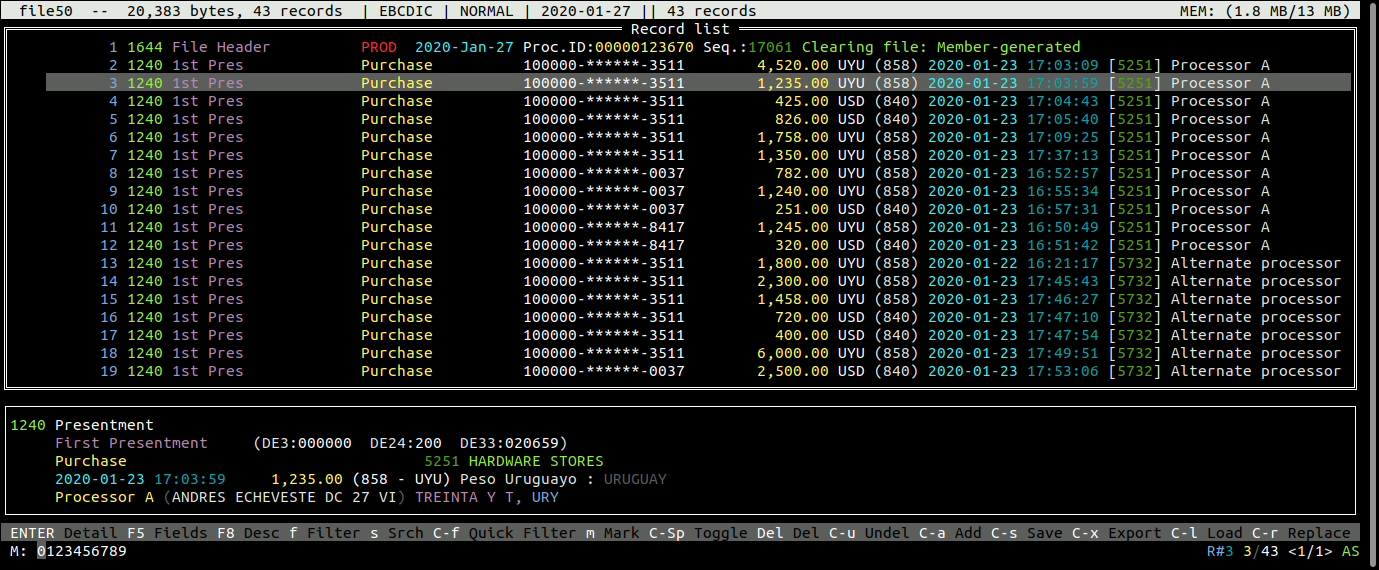
We have this file:
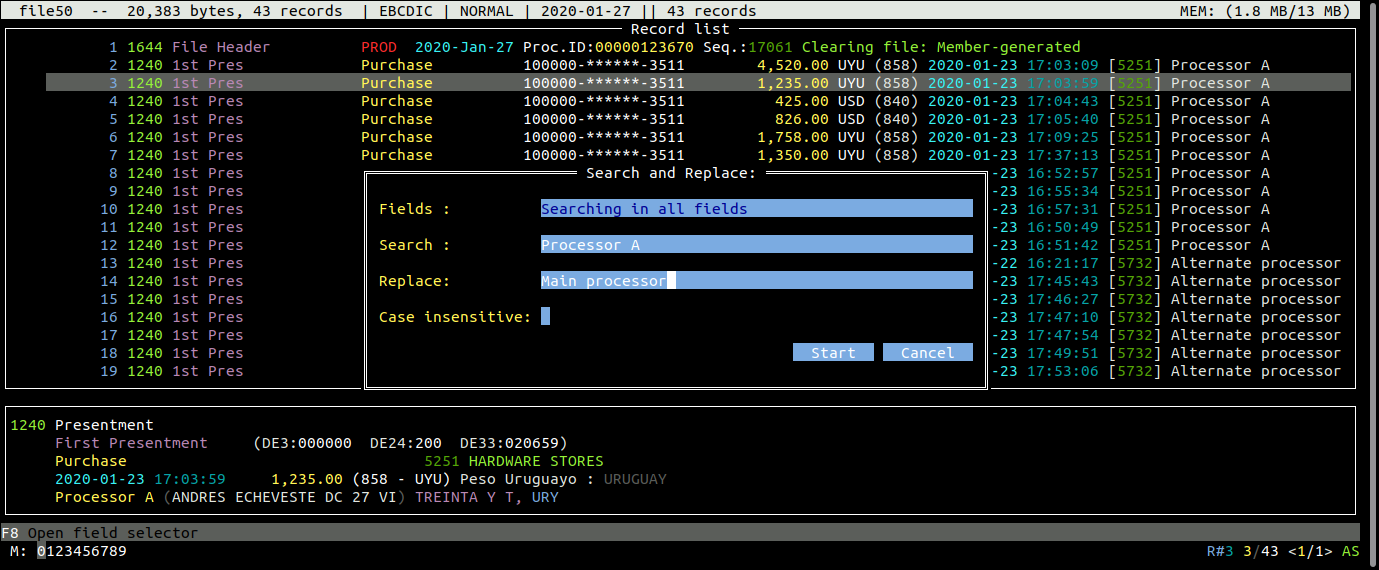
And we want to replace the merchant name from “Processor A” to “Main processor”. We press Ctrl-R and enter the criteria and values
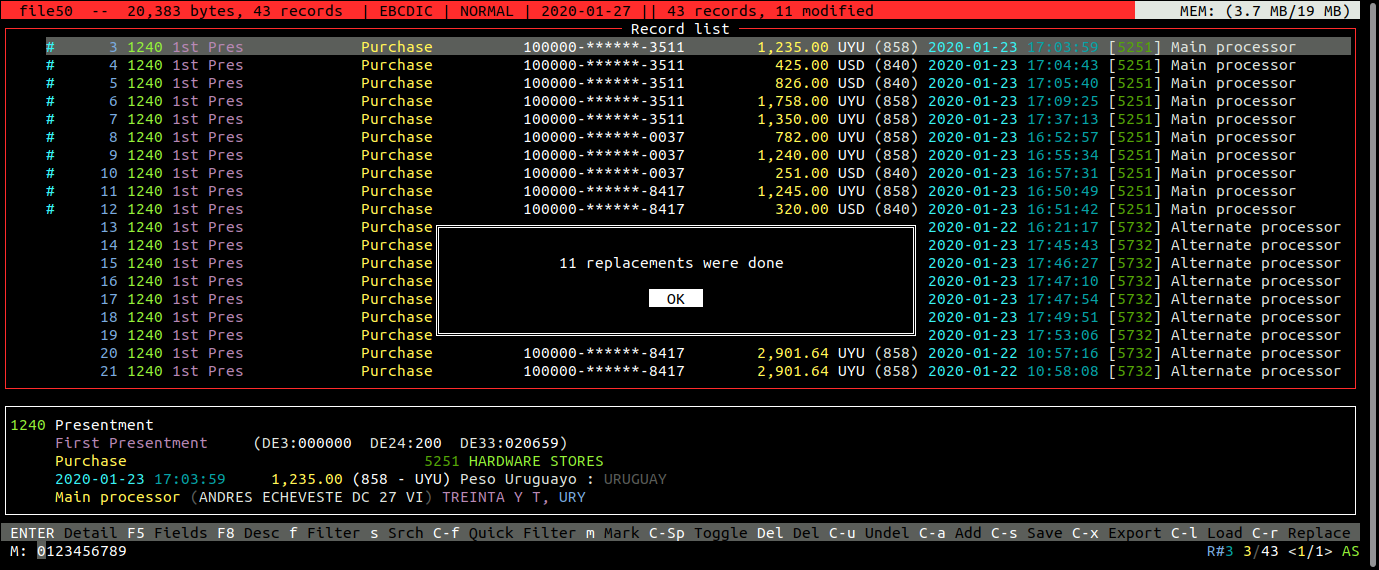
Pressing the "Start" button, we get this:
We can see that 11 replacements were done, and the upper bar turns into red to indicate changes in the file. We also see in the main view that on the left of the modified records the character "#" is shown in cyan.
Always remember that in order to keep the changes, we need to save it into a new file.
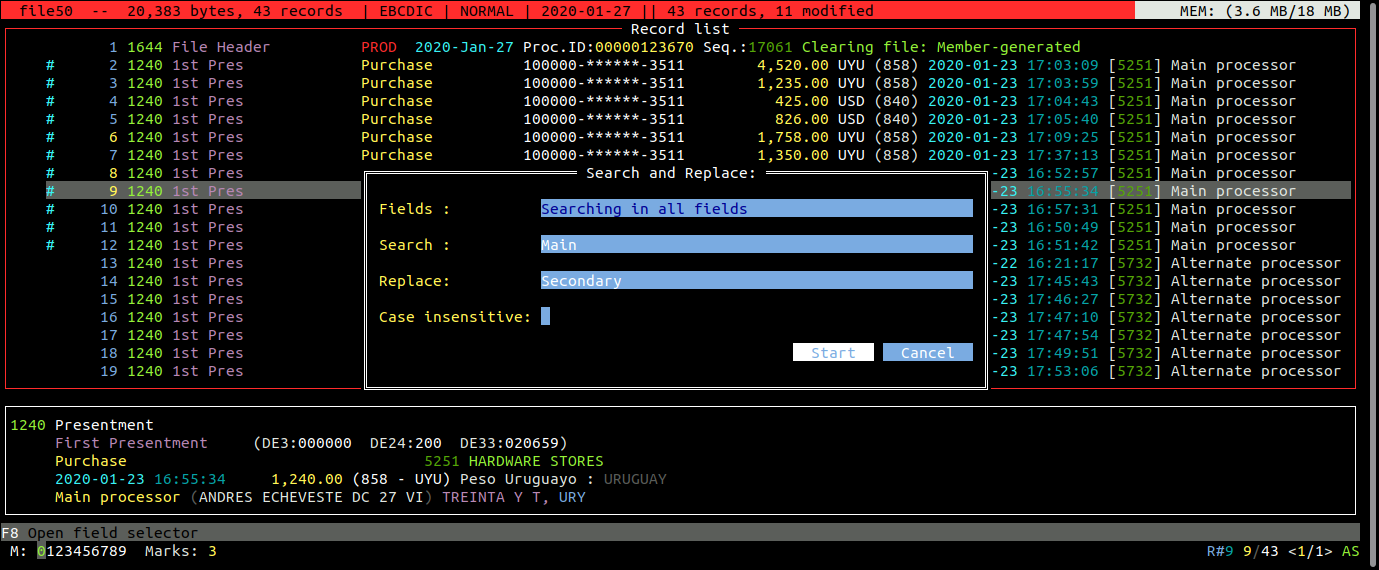
If we want, for example, to perform the replacement only in some records, we must mark them before the Search/Replace operation. In this example we have marked records 6, 8 and 9 (we observe the record numbers in yellow), and we replace the value of “Main processor” to “Secondary processor” only on those records:
And the final result is this:
Auto save functionality
An auto save functionality is available, which is automatically activated when the file contains few records (less than 2000) but we can manually activate at any time by pressing the F6 key. The reason this function is deactivated for larger files is that saving can take some time, and if the file contains many records, the save operation can take quite a long time and it can interfere with the usage of the tool if it saved after each modification. So in order to make it more resopnsive, this functionality is only activated automatically for small files where the time for saving records is minimal.
When Auto save is active, modifications in the file are automatically saved to a copy which contains the name of the original file plus “_AUTOSAVE.ipm”
Manual saving
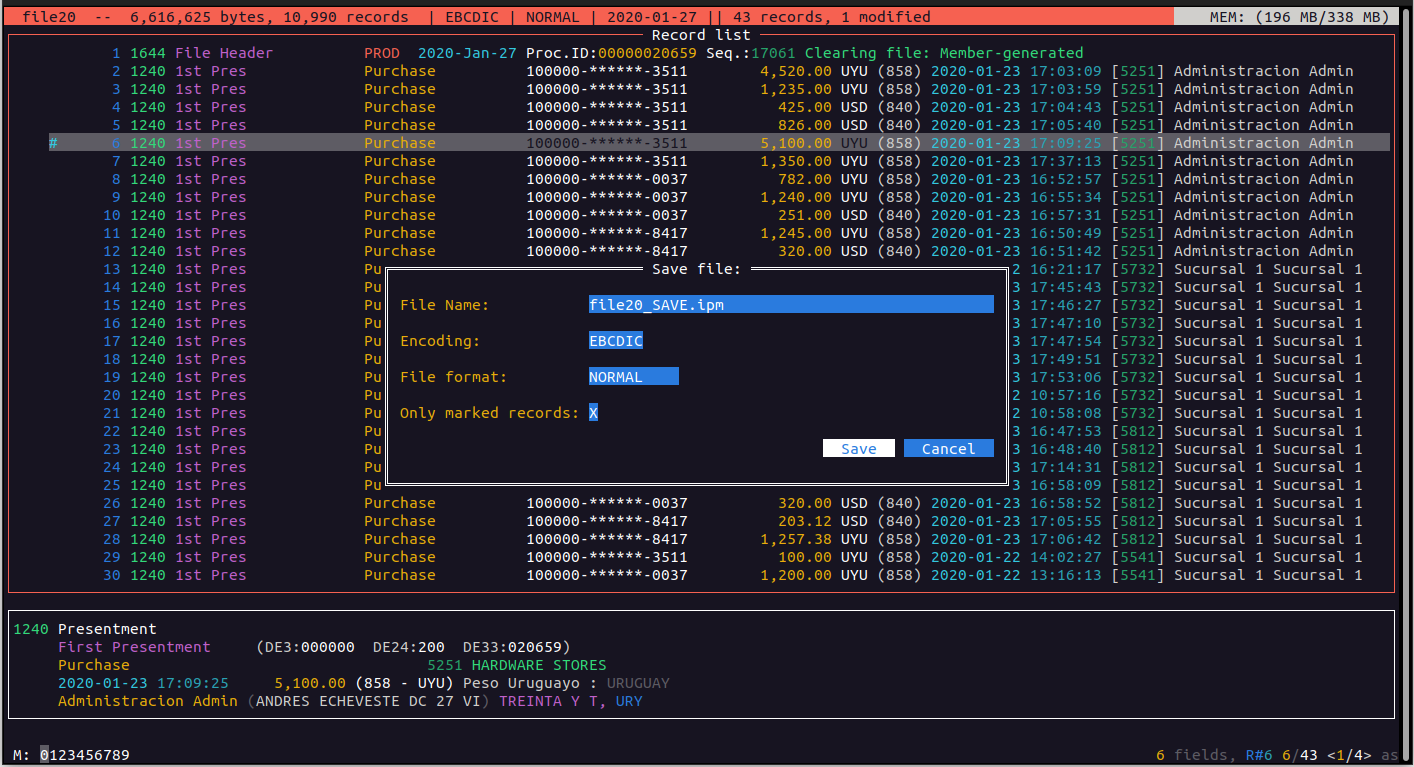
After making modifications to the file, we can choose to either discard or save those changes into a new file.
To save the changes, we can press Ctrl-S and a dialog is presented where we can choose the name of the new file, the encoding and format for this new file, and an options where we can choose to save only the currently marked records or all of them (except the deleted ones)
By default its name is the same as the original file plus “_SAVE.ipm”. The encoding and file format suggested is the same as the original file, but they can be changed, so besides saving the changes to a new file, we can perform a conversion format.
Here we can see one of the advantages of the ability to mark records.
Export records
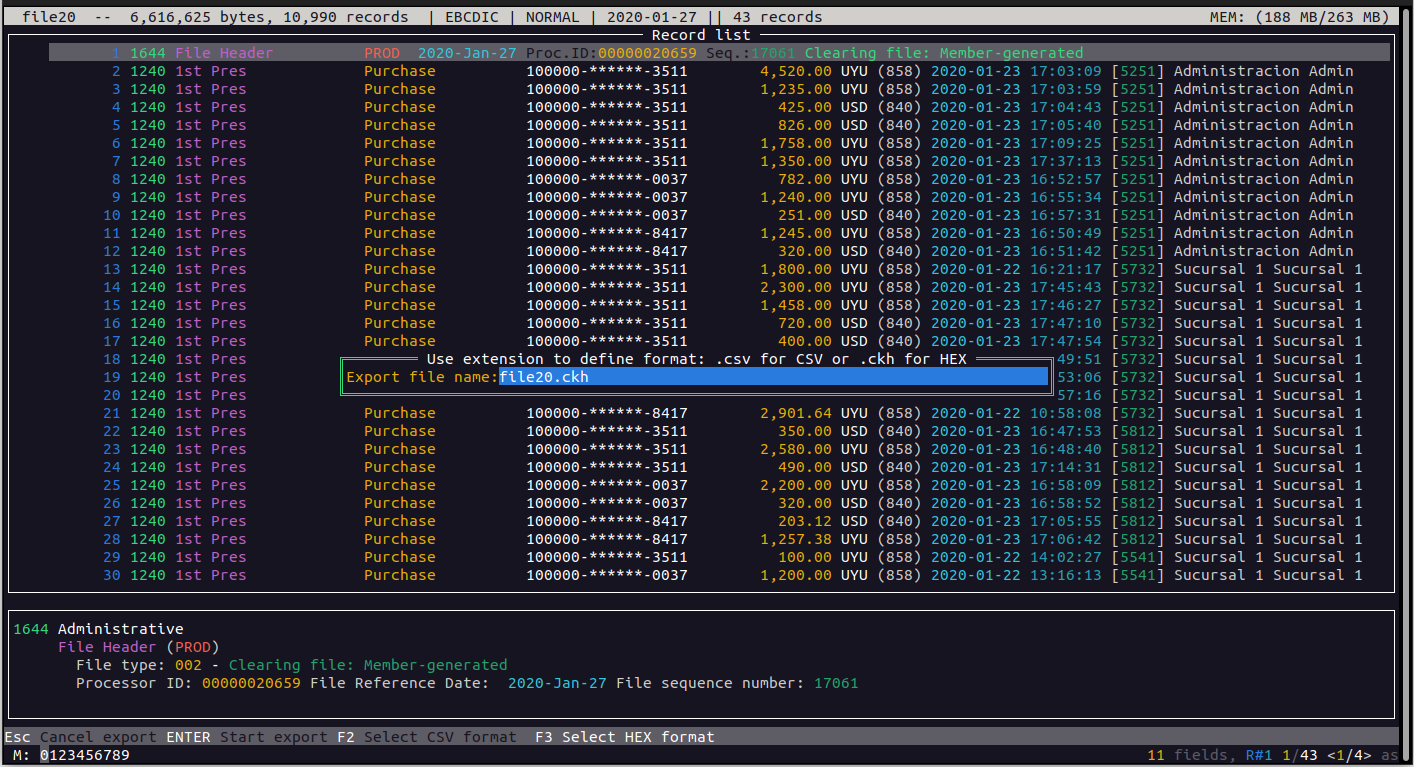
By pressing Ctrl-X we will be able to export the marked records, or all of the records if there are no marked ones.
The export format options are the same used by the EXPORT command, that is, CSV or HEX. We indicate the output format by changing the extension of the exported file. If we want to export to a CSV file, we add the extension ".csv", and if we want to export the records as HEX, we add the extension ".ckh".
To help select the correct format, we can press F3 to toggle between both format extensions.
It is important to note here that by selecting the CSV format, if we have an active field selector filter, only those fields will be exported (for HEX format the whole record is always exported)
![]()
Importing records
As with the IMPORT command, we can importe previously exported records either in CSV or HEX formats. The CSV files that can be imported must contain a full record exported, so all of the fields of the original record should have been exported, so exporting partial records are not allowed as sources for import.
To do this, we press Ctrl-L and we will see a list of available files that contain previously exported data if any is found.
Selecting one and pressing ENTER, all records contained in that file will be appended at the end of the current file. We need to save this modified file in order to keep the changes.
Mark slots
In the lower bar over the left, we can see something like this:
![]()
This is an indicator of the different "Mark slots" and an indicator of their contents. We have 10 different "memories" where we can store up to 10 lists of marked records. Every time we mark a record it is added to a list in the currently selected slot. The default slot is slot number 0, but we can choose any other one at any time.
This helps by having up to 10 different mark lists, each one containing possible different lists of marked records, and by changing the area we retrieve the corrsponding marked lists.
For example, we could make 4 different searches and the result of each one can be stored in a different area (or slot). then, we can just retrieve any result and perform actions like exporting the corresponding records.
To change the current slot, we must press the "m" key followed by a digit corresponding to “0” to “9"